
How to disable the Encrypting File System (EFS) feature in Windows 11.
Contents
- 1 How to Turn off Windows File Encryption (EFS) Windows 11 Using the Command Prompt
- 2 How to Turn off Windows File Encryption (EFS) Windows 11 Using the Local Group Security Policy
- 3 How to Turn off Windows File Encryption (EFS) Windows 11 Using the Local Group Policy Editor (Windows 11 Pro)
- 4 How to Turn off Windows File Encryption (EFS) Windows 11 Using the Registry
- 5 How to Turn off Windows File Encryption (EFS) Windows 11 Using Services
How to Turn off Windows File Encryption (EFS) Windows 11 Using the Command Prompt
If you don’t have much time on your hands and want to get this done immediately, you can do it by using Command Prompt as an administrator. Search for the Command Prompt in the search bar, and when it comes up in the search results, select open as administrator. When it opens, type the following command fsutil behavior set disableencryption 1
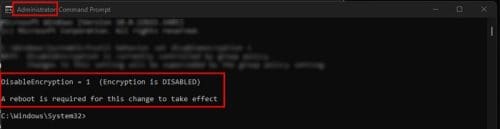
To turn it back on later, type the same command but make the one a zero. You should see a message on the Command Prompt letting you know that it was enabled or disabled and that you need to restart your computer for the changes to take effect.
How to Turn off Windows File Encryption (EFS) Windows 11 Using the Local Group Security Policy
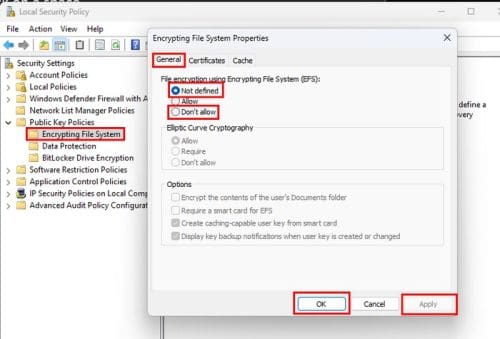
Suppose you had trouble with the previous method. Or feel more comfortable using the Local Group Policy; you can disable it by pressing the Windows + R keys and entering secpol.msc and pressing enter. Once the Local Security Policy window opens, click on Security Settings at the top and click the dropdown menu for the Public Key Policies option. When you can see the additional options right-click on Encrypting File System and choose Properties. When the window opens, make sure you’re on the General tab and choose the Not Defined or Don’t Allow option. Once you’re done, you’ll need to restart your computer for the changes to take effect.
How to Turn off Windows File Encryption (EFS) Windows 11 Using the Local Group Policy Editor (Windows 11 Pro)
You can also use the Local Group Policy Editor to disable the Windows File Encryption. Open it by pressing the Windows + R keys and entering gpedit.msc and press enter. When the window opens, go to
- Computer Configuration
- Administrative Templates
- System
- Filesystem
- NTFS
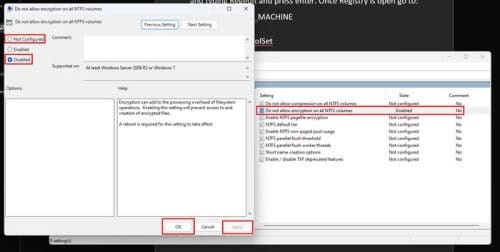
Look for an option called Do not allow encryption on all NTFS volumes. Double-click on it, and when the other window opens, click on Not Configured or Disabled. Click on Apply and Ok to close the window. You’ll need to restart your computer to apply the changes.
How to Turn off Windows File Encryption (EFS) Windows 11 Using the Registry
Since you never know what might go wrong, it’s best always to have an up-to-date backup of your registry. If all is good to proceed, open the Registry by pressing the Windows + R keys, typing Regedit, and pressing enter. Once Registry is open, go to:
- HKEY_LOCAL_MACHINE
- SYSTEM
- CurrentControlSet
- Policies
- Right-click on a space
- Choose New
- Select DWORD (32-bit)
- Name it HtfsDisableEncryption
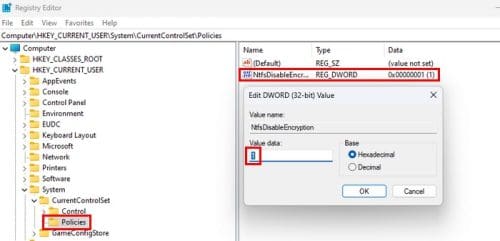
To turn it off, set the Value data to one. To enable it, you would need to change it to zero.
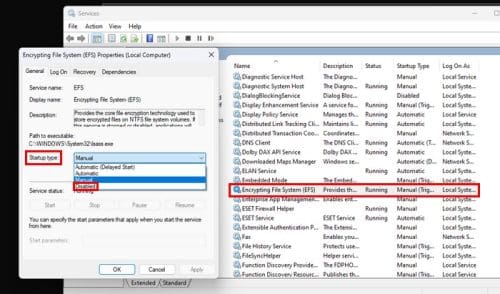
How to Turn off Windows File Encryption (EFS) Windows 11 Using Services
It’s also possible to disable Windows File Encryption by using Services. To open Services press the Windows +R keys and enter services.msc and press enter. Once it opens, scroll until you come across an option called Encryption File System; double-click on Startup type, and in the Startup type option, choose disabled from the listed options. Ensure that you press Apply, followed by Ok, to the changes can be saved.
Further Reading
As long as we’re on the subject of encryption, here are some helpful articles you might want to read on the subject. For example, you might want to see what Asymmetric Encryption is and Symmetric Encryption. If you use Gmail, you know that it uses end-to-end encryption, but what does that mean? Read this helpful info to find out more. Also, if you’re a Bitwarden user, you might want to know how to update your Encryption key settings.
Conclusion
You have reasons why you want to turn off the Windows File Encryption. The good news is that you have various options to go about it; just in case you experience problems with one method, you can always try the others. You can go with options such as the Registry, Local Group Policy, or Services, just to mention some options (not all). Which one do you think you’re going to use as your favorite? Share your thoughts in the comments below, and don’t forget to share the article with others on social media.

“The Encrypt Contents to Secure Data block has remained grayed out.”
This is the same on my computer – can someone tell me how to enable my access to encrypt folders / files? I am not a programmer, but can enter simple commands if anyone can provide clear instructions. Thanks!
Doesn’t work for me. Have changed NtfsDisableEncryption DWORD from 0 to 1 and back to 0. The Encrypt Contents to Secure Data block has remained grayed out. I’ve rebooted after changing it each time.