
Telnet may be a simple command-line tool on your computer where you can see commands remotely to a server and control that server just as precisely as being right in front of the server. People don’t use it frequently, so some might wonder why you want to enable it in the first place. Maybe you’re feeling nostalgic and want to do something that doesn’t put your online security at risk. Whatever your reason, remember not to use Telnet to share sensitive information, such as usernames and passwords, since there is no encryption. If you want to turn it on, here are the steps to follow.
Contents
How to Enable Telnet on Windows 11 Using the Command Prompt and PowerShell as Administrator
There are different ways you can go about when enabling Telnet, and the Command Prompt is one of them. Open the Command Prompt as an administrator by searching for it in the search bar, and when it comes up in the results, choose as Administrator. Or, if it’s in Recents, right-click on it and choose as Administrator.
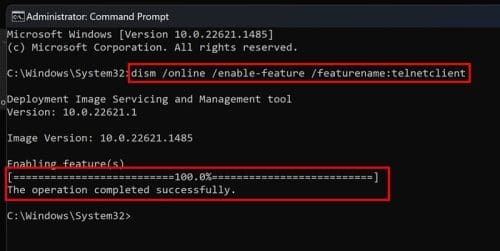
Once it’s open, type the following command and press enter once you’re done.
dism /online /enable-feature /featurename:telnetclient
(The above command will work on both Command Prompt and PowerShell as administrator)
Another command you can try if you have problems with the one above is
Enable-WindowsOptionalFeature -Online -FeatureName TelnetClient
(The above command will only work on PowerShell as administrator)
The Command Prompt will show you a brief message that it’s enabling the feature, and you’ll see a percentage to see how far along it is. When it reaches 100%, it’ll say that the operation was completed successfully.
If you want to disable it, enter the same command but change the word enable for disable and press enter. That’s all there is to it. If you’re new to Telnet and want to see something fun you can do with it, keep reading.
How to Check That Telnet Has Been Enabled
So far, so good. The Command Prompt said everything was done successfully, but now it’s time to check if that’s true. Type Telnet in the Command Prompt, and you should see a message that says Welcome to Microsoft Telnet. If you see this, then it was enabled successfully. There is no need to restart your computer.
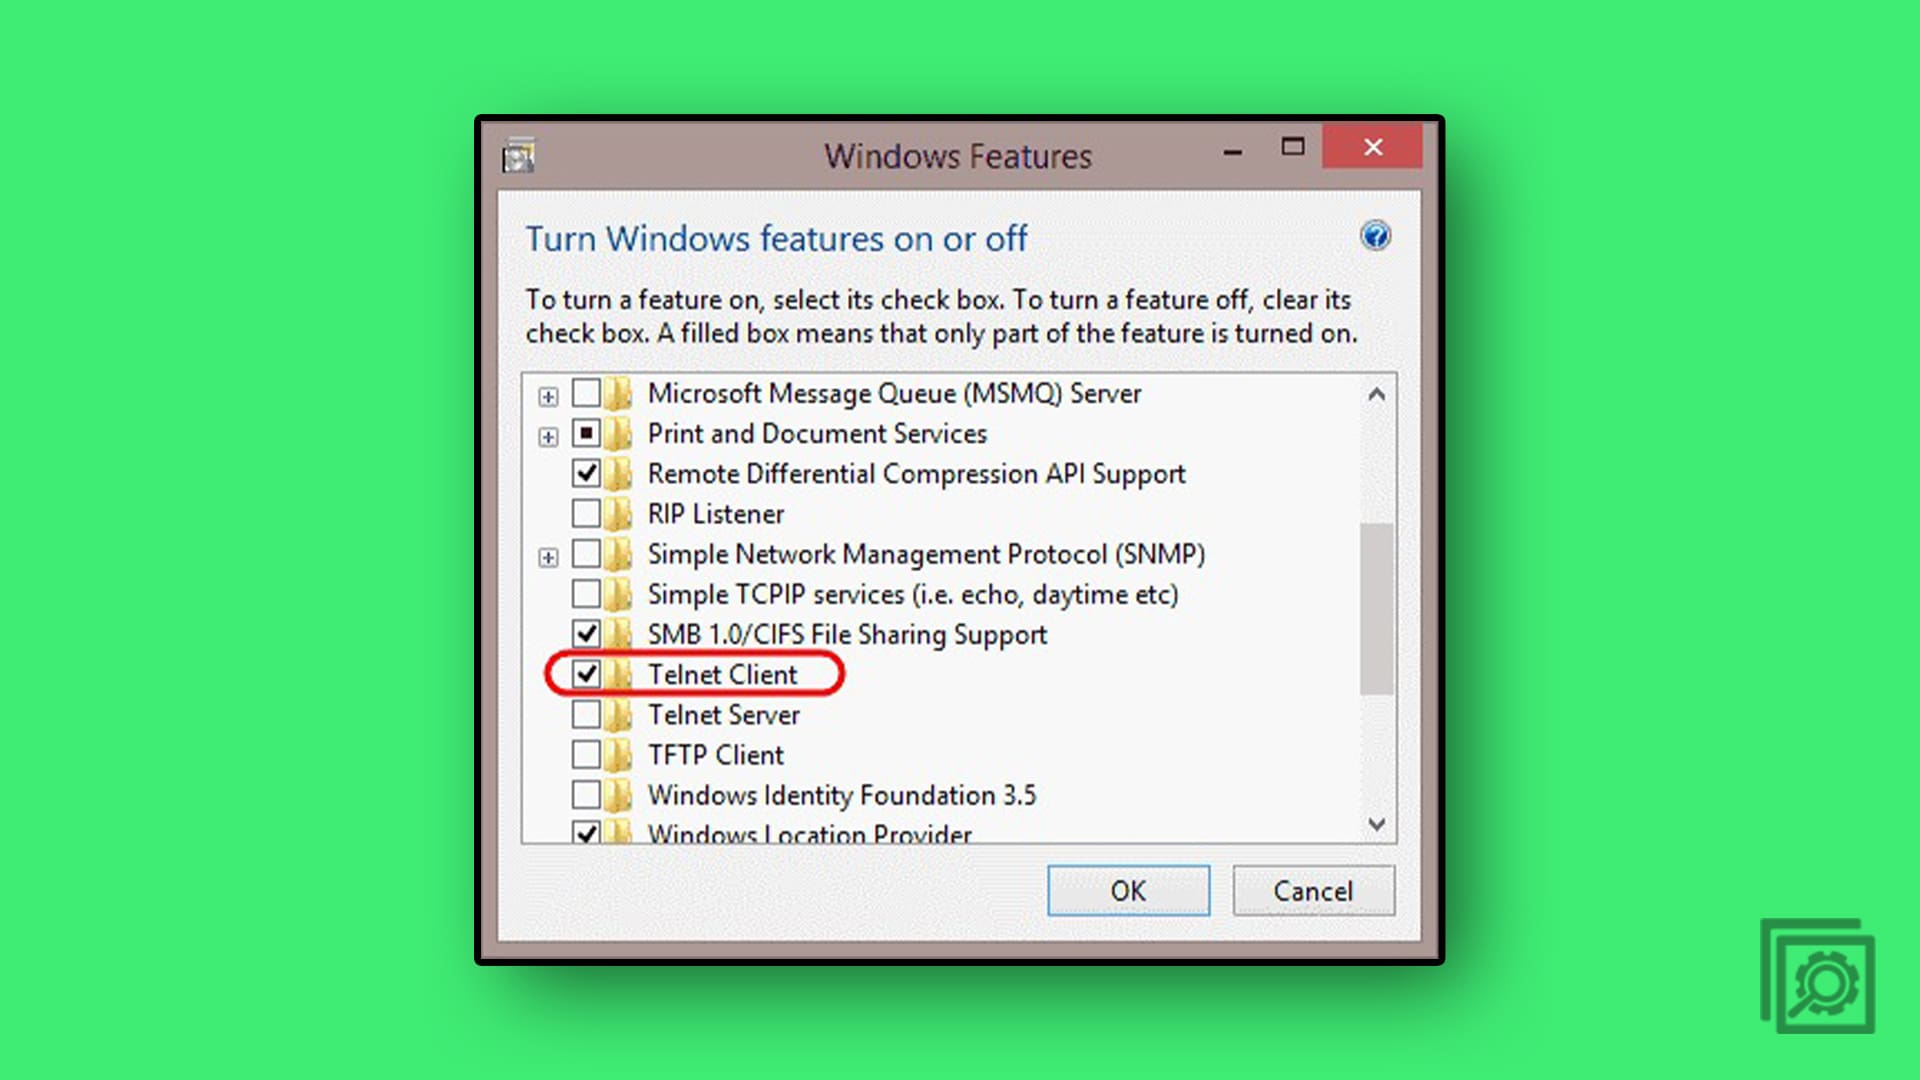
How to Enable Telnet on Windows 11 Using the Control Panel
- Right-click the Start button then select Settings.
- Select Apps > Optional Features > More Windows Features.
- A small window will appear where you’ll need to check the box for Telnet Client. Click Accept and wait for the process to finish. When you want to uninstall Telnet, follow the same steps, but this time uncheck the box for the Telnet client and click OK.
Additional Information About Telnet
Don’t worry; this will not be a crash course on Telnet. It’s just some fun facts to get to know it better. For example, Telnet was first created in 1969. Telnet is a terminal emulation program used to gain access to remote servers, and it stands for Teletype Network. With Telnet, you only use simple commands with your keyboard to control that server. You can do things such as:
- Create Folders
- Start or stop services
- Transfer files
- Browse directories
- Check if ports are open or closed on a server
Telnet is not recommended for sending important information such as passwords and usernames since your data will easily be intercepted. If you need to use Telnet services, it’s better than you use SSH (Secure Shell).
How to Watch a Star Wars Movie on Telnet
Before you get too happy, know it will be an inferior version, but it’s something to watch. You can stop watching the Star Wars movie by closing the Command Prompt at any time. To see Star Wars, enter telnet towel.blinkenlights.nl
Don’t be surprised if you don’t see it immediately. It takes a few seconds to start.
How to Play Chess on Telnet
To play chess on Telnet, you’ll need to enter telnet freechess.org 5000
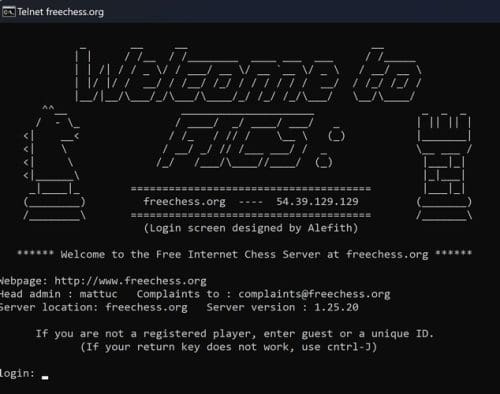
You’ll be asked to enter a unique ID, but it can’t include numbers. You can only include upper and lower-case letters.
How to Check the Weather Using Telnet
You can also check the weather for a specific city on Telnet. Enter telnet rainmaker.wunderground.com and enter. Now enter a city code to get the weather for that city.
Further Reading
If you’ve had enough of Telnet and want to read about other interesting things you can do on different devices, here is how you can improve your Windows 11 Startup time and change the image thumbnail size. Also, for those times when you need to share your Wi-Fi, here is how you can turn your Windows 11 computer into a hotspot. On another subject, running out of storage on any device can be a real headache. Here is how you can deal with storage issues on your PS5.
Conclusion
Enabling or disabling Telnet is an easy task. You can choose to enable/disable it from Command Prompt, PowerShell, or the Control Panel. There is no need to restart your computer, and you can quickly check to see if it’s on by typing the work telnet and pressing enter. It’s that easy. Remember never to send sensitive information when using Telnet since it can easily be stolen: you can use Secure Shell for that. What will you be using Telnet for? Let me know in the comments below, and don’t forget to share the article with others on social media.


you could use telnet from command prompt
After opening the command prompt, you could type telnet /? to get info on how to use it
Okay, suppose do get Telnet client installed. Now where the heck is it?
Not working!
Note: PkgMgr.exe has been deprecated. Please update your scripts to
use DISM.exe to install, uninstall, configure, and update features
and packages for Windows.
See http://go.microsoft.com/fwlink/?LinkID=195329 for more
information.
Operation failed with 0x80070057
Thanks, my guy
Worked exactly as described. Thank you!
Windows 10, dont have Control Panel.., but comand line, function very well.
Thanks
Wow wow, this manual is wicked simple but highly helpful.
Thanks you to whom made this manual.
How did you guys enable telnet on the latest windows 10 version?
Thanks for your introduce,it’s worked
Thanks for offering two options. With the latest Win 10 updates the Telnet Client no longer appears on menus. Fortunately the command line option still works.
Thanks man ., you are the best
Hi There, Thank you for this amazing steps. I was able to work it out with your help.
Thanks.
Thanks it helped..
Thanks! Working :)
Doesn’t work. I tried 3 time. It keeps saying it needs to reboot to finish the process (why? there’s no conceivable reason except incompetent program that this should require a reboot, but anyway…) I let it reboot. Telnet still doesn’t work. I try again, the telnet client box is not checked. I check it and says “searching for required files”, and then says it has to reboot for it to complete. I let it reboot. It comes up (eventually), I start up all my standard apps (a good 10 minutes), try to telnet again, says it doesn’t recognize the command, I go back to programs in the control panel, Telnet Client is still not checked, check the box, click okay, repeat 2 more times. What a frigging waste of time this brain-dead O/S is!
Great help thanks
working!!1
My Telent keeps crashing while I am using it. I have attempted to turn off the feature and then back on again but it did not fix the issue.
Do you know why this is happening and how I can fix it?
hello, thanks for your information. simply wicked.
Wow! I really appreciate your time, and depth of knowledge. The little “nuggets” are clear, concise, direct and simple. Your “In Plain English” approach is perfect for beginner and advanced alike. The broad range of you expertise shows real commitment to your career choice. It is always a pleasure to see the work of a master. I’ve bookmarked your page already, and have visited it 3 or 4 times since I found it last Friday (July 31, 2015).
Can’t thank you enough,
Respectfully,
William (Bill) Armstrong A+ Certified (2003) MCSE: Enterprise Devices and Apps Candidate