Skip to content
LogoTechnipages
LogoTechnipages
  • Topics
        • Android
        • Browsers
        • Gaming
        • Hardware
        • Internet
        • iPhone
        • Linux
        • macOS
        • Office
        • Reviews
        • Software
        • Windows
        • Definitions
        • All Recent Posts
  • Product Reviews
  • About

Linux Mint: How to Enable the on-Screen Keyboard

Mel HawthorneNovember 27, 2020 Comments (3)

If you have difficulty with using a keyboard, you may prefer using an on-screen keyboard that you can control with other input devices. While not particularly useful for most users, it can be important to those users that need it.

To activate Linux Mint’s on-screen keyboard, you need to go into the accessibility settings. To do so, click on the Linux Mint icon in the bottom-left corner, then move the mouse up to “All Applications” and then sideways to the top option “Accessibility”.
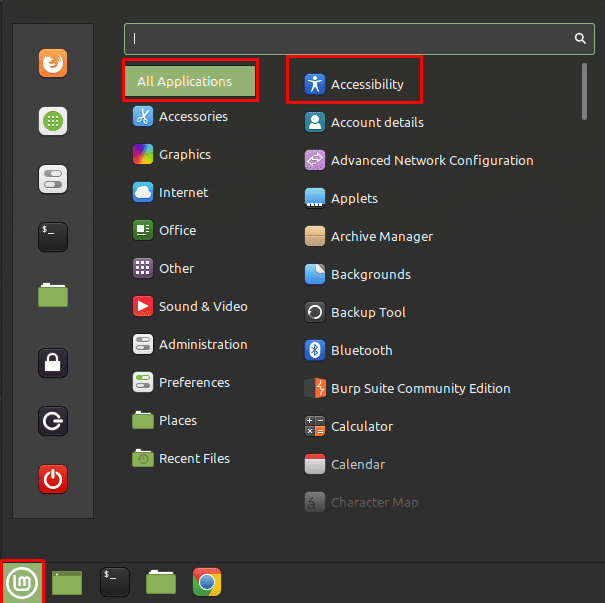
To open the accessibility settings, click on the Linux Mint icon in the bottom-left corner, then hover over “All Applications” and click on “Accessibility”.

Once in the accessibility settings, switch to the “Keyboard” tab and click the top slider, labelled “Enable the on-screen keyboard” to the “On” position.
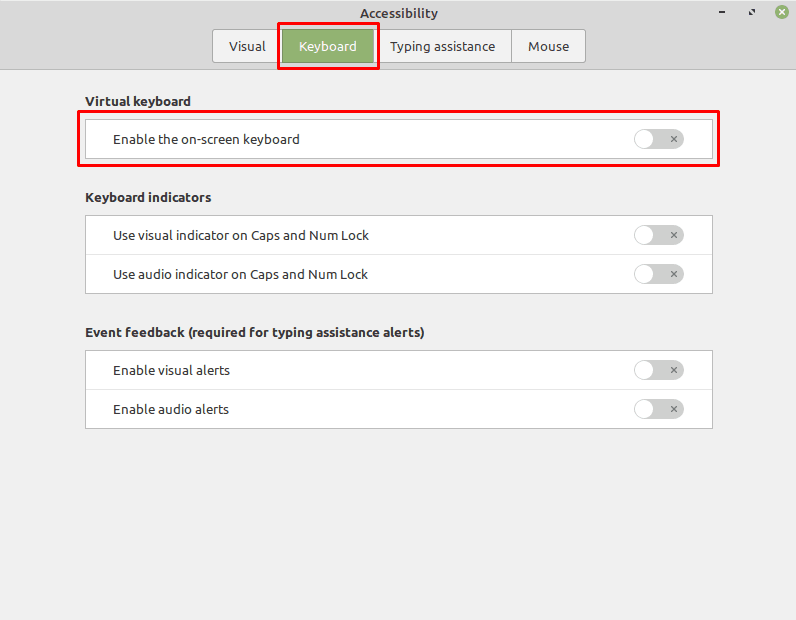
Switch to the “Keyboard” tab, then click the “Enable the on-screen keyboard” slider to the “On” position.

Four more keyboard options will appear once the keyboard has been enabled. The first allows you to configure the layout of the keyboard, you can choose between “Tablet”, “Touch”, “Full scale”, and “Scanning”.

“Keyboard position” allows you to configure the location of the on-screen keyboard. You have a choice between it being located at the top or the bottom of the screen. The “Keyboard size” option, allows you to configure how much of the screen the on-screen keyboard takes up, with the ability to choose a quarter, third, or half of the vertical space of the screen.

Note: When testing the keyboard position and size settings, it appeared the on-screen keyboard needed to be toggled off and on again for the settings to take effect. It’s also important to point out that placing the on-screen keyboard at the bottom of the screen caused it to interfere with screen elements such as the start menu. Placing the keyboard at the top of the screen reliably set that part of the screen aside for the exclusive use of the on-screen keyboard.

Placing the on-screen keyboard at the bottom of the screen can cause it to interfere with the start bar.

The “Activation mode” setting allows you to choose if the on-screen keyboard is always enabled when the user has enabled it, or if the keyboard only appears if a text box is expecting input.

Note: Some apps, such as Google Chrome do not get recognised as expecting input so the keyboard may never show up unless set to be always enabled.
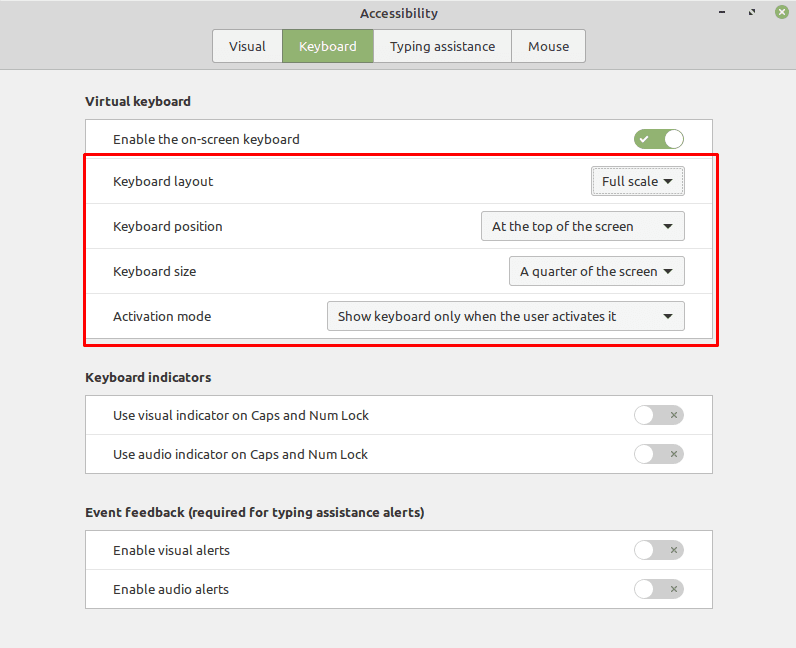
For the best experience, we would recommend using your preferred layout, placing the keyboard at the top of the screen, setting it to “a quarter of the screen”, and leaving it permanently enabled.

Categories: Software

Author Mel Hawthorne

You Might Also Like

  • fix caa70007 microsoft teams

    Troubleshooting Microsoft Teams Error caa70007

    Madalina DinitaSoftware
  • MS Teams Header

    Microsoft Teams: How to Disable Animations

    Madalina DinitaSoftware
  • microsoft teams Enable Logging For Meeting Diagnostics

    Teams: Enable Logging for Meeting Diagnostics

    Madalina DinitaSoftware
  • stream microsoft teams to facebook live

    How to Stream Microsoft Teams to Facebook Live

    Madalina DinitaSoftware

Comments

  1. Tim says:
    February 17, 2023 at 6:15 am

    You can add the icon fairly simply by right clicking the Virtual Keyboard icon on the Mint Menu and clicking Add to Menu or Add to Desktop

  2. David Francis says:
    June 25, 2022 at 12:54 pm

    Don’t know which version of Linux Mint you are using, but in LM 20.3 MATE 1.26..o , against the Vitruvian Man icon is Assistive Technologies. Opening that has Keyboard Accessibility, but nowhere under that is a virtual or onscreen keyboard option. Going through Control Centre only brings up the same dialogs.

  3. David says:
    January 1, 2022 at 9:50 am

    But what it the option to turn it on and off when needed? There isn’t a icon on bar at the bottom

Leave a Reply

Your email address will not be published. Required fields are marked *

average laptop lifespan

What Is an Average Laptop Lifespan?

fix 0x80070302 windows update error

How to Fix the 0x80070302 Windows Update Error

how to allocate more memory to a program

How to Allocate More Memory to a Program in Windows

marvel rivals memory leak fix

Marvel Rivals Using Too Much Memory – How to Fix

how to create a macro in word

How to Create a Macro in Word

profile pic

The Experts Behind Technipages

My name is Mitch Bartlett. I've been working in technology for over 20 years in a wide range of tech jobs from Tech Support to Software Testing. I started this site as a technical guide for myself and it has grown into what I hope is a useful reference for all.

Learn More

technipages logo white
linkedin icon

Technipages is part of Guiding Tech Media, a leading digital media publisher focused on helping people figure out technology. Learn more about our mission and team here.

© 2025 Guiding Tech Media All Rights Reserved

  • About Us
  • Contact
  • Legal & Privacy

© 2025 Guiding Tech Media All Rights Reserved

Information from your device can be used to personalize your ad experience.
Do not sell my personal information.

Last Updated on November 27, 2020 by Mitch Bartlett