When you compress files in Windows 11, you help reduce storage space and can save additional data in the same area. Compressing files also enables you to transfer files faster, but before you look for third-party software to help you with that, why not use the integrated feature in Windows 11 that allows you to compress your files? That way, if your computer is running slow, you won’t add to the load by installing more software. Keep reading to see how you can compress a file, a folder, and even an entire drive on your computer without third-party software.
Contents
How to Compress a File in Windows 11
To compress a file, you’ll need to open File Explorer. You can open using your preferred method or press the Windows + E keys for the fastest access.
Once File Explorer is open, look for the file you want to compress by opening its folder. Right-click on the file and choose the Compress to ZIP file option. The compressed file will appear beside the original. Another path to compress the file is to click on the file to select it, click on the three dots at the top right, and choose the Compress to ZIP file option.

You can open the file by clicking on it, but if it doesn’t open right, click on it, choose the Extract All option, and choose where to save the file. The recently extracted file should appear in a new window in File Explorer for you to click on and open.
How to Compress a Folder and Sub-Folders in Windows 11
On Windows 11, you can compress files and sub-folders as well. To do this, locate the folder you want to compress, right-click on it, and choose the Compress to ZIP file option. Remember to give your new folder a name and press enter.
To view what you have in the folder, you can open it by double-clicking it. If it doesn’t open, right-click on the folder and choose the Extract All option. If your folder has sub-folders you also want to compress, there are additional steps to follow.
Compressing Sub-Folders
Locate the folder you want to compress and right-click on it. Click on Properties and ensure that you’re on the General tab. You should see an Advanced button at the bottom right; click on it and check the box for the Compress contents to save disk space option. Click OK, followed by Apply.
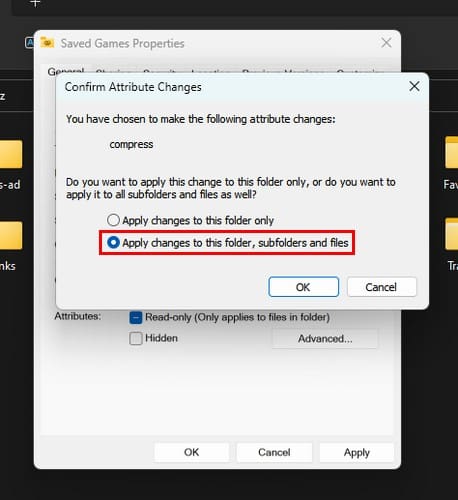
You should see a new window asking if you want to apply these changes to the folder only or all the sub-folders. To apply the changes to everything, choose the Apply changes to this folder, subfolders, and files option. Click the OK button on the first and remaining window.
How to Compress an Entire Drive in Windows 11
If you need to compress an entire drive, you can do it on your Windows 11 computer without installing additional software. Remember to open File Explorer by pressing the Windows + E keys. When File Explorer opens, right-click on the drive you want to compress and choose the Properties option.
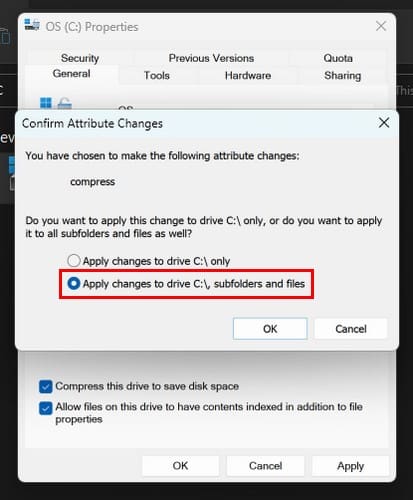
When the Properties window appears, check the box for the Compress this drive to save disk space. Click the Apply button, and you’ll also see the same window you saw if you compress a folder where you can choose to have all the folders and sub-folders compressed. From now on, any files you add to the drive will be compressed.
Further Reading
Windows is not the only OS where you can compress files. If you’re an Android user, here are fours app to compress files. You compress your files on your Chromebook, but you need help opening them. Here are the steps to follow to open those files. Also, if you want to go into more detail on what happens when you compress a file, we’ve got you covered on that too.
Conclusion
When compressing a file, you can use plenty of third-party software. But if you’re computer is already running slow, the last thing you want to do is install more software. It’s a relief that you can compress your files by only using your Windows 11 computer, whether you need to compress a file, folder, or an entire drive. How many files did you need to compress? Share your thoughts in the comments below, and please remember to share the article with others on social media.