Steam Deck is a handheld gaming device that runs on a customized version of SteamOS, which is optimized for gaming. Like any electronic device, it may encounter technical issues or glitches that can be resolved by resetting the device. Resetting the Steam Deck can also be helpful when trying to troubleshoot problems such as freezing, crashing, or other software-related issues.
In addition, resetting the Steam Deck can be necessary when preparing the device for a new user or when selling it. This is because resetting the device will erase all data, settings, and personal information, ensuring that the new user has a fresh start with the device.
It’s worth noting that resetting the Steam Deck is a relatively simple process that involves accessing the device’s settings menu and selecting the appropriate option. However, it’s important to remember that resetting the device will erase all data and settings, so it’s recommended to back up any important data before proceeding with the reset.
Contents
Force Restart Steam Deck
But before you have to go through the steps to reset Steam Deck, you can try and force restart your Steam Deck. This is helpful if you find that the software isn’t working properly, or your device is simply frozen. Here’s how to force restart your Steam Deck.
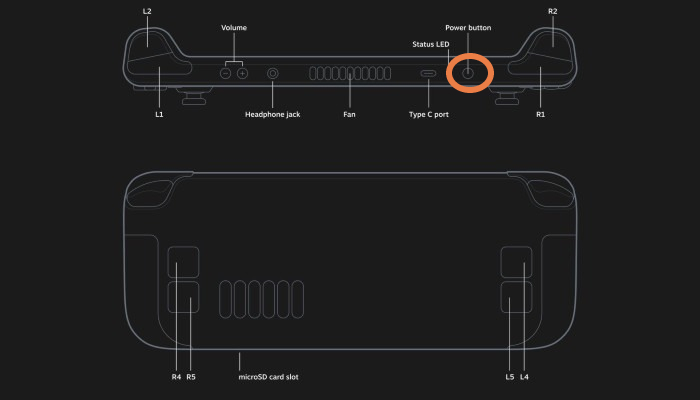
- Press and hold the Power button for at least 12 seconds.
- Once the Steam Deck is turned off (no fans spinning or anything on the screen), press and hold the Power button until you hear the boot sound.
Provided that everything is okay with your Steam Deck, you should be back up and running in just a few moments. That being said, there’s still a chance that you still experience some issues, so let’s dive a bit deeper.
Reset Steam Deck to Factory Settings
The first method to reset Steam Deck to factory settings is to do so from the SteamOS interface. Valve makes it easy to access a bunch of different menus and options, without needing to enable Developer Options or accessing Desktop Mode. Here’s how you can easily reset Steam Deck to factory settings.
- Turn your Steam Deck on and make sure you’re logged in.
- Press the Steam button on your Steam Deck.
- From the menu, scroll down and select Settings.

- Select System.
- Scroll down until you reach the Advanced section.
- Highlight and select the Factory Reset button.
- Select the Factory Reset button again to confirm.


After a few moments, your Steam Deck will reset itself back to the factory settings, removing all of your installed applications, games, and other files that may be on the device. Once the Steam Deck is finished rebooting, then you’ll be able to enjoy a fresh start and hopefully won’t have to worry about any other issues.
Reset Steam Deck Using Recovery
If you’re experiencing issues with your Steam Deck that cannot be resolved through normal troubleshooting methods, you may need to perform a system recovery to reset the device to its factory settings. A system recovery will erase all data and settings from the device, so it should only be done as a last resort.
This method is a bit different from what you might expect, as you are actually installing the SteamOS recovery image onto a USB drive. This method is preferred for those who want to reinstall SteamOS without losing all of their games, saved data, and other files. However, in the event that you are still running into issues, you can also use the recovery image to reset Steam Deck to factory settings.
- Download the SteamOS Recovery Image to your computer.
- Plug the USB drive into your computer.
- Open the appropriate Utility software based on your computer’s operating system.
- For Windows, Valve recommends using Rufus.
- For Mac and/or Linux, Valve recommends Balena Etcher.
- Follow the on-screen steps to select the SteamOS recovery file and write it to the USB drive.
- Once the process is complete, eject the drive from your computer.
- Connect a USB hub to your Steam Deck.
- Plug in the newly-created recovery drive.
- Shut down your Steam Deck completely.
- Hold the Volume Down button.
- Press and release the Power button.
- When you hear a chime, release the Volume Down button.
- From the Boot Manager, select the EFI USB Device.
- Wait until you are booted into the Desktop environment.
- Once in the Recovery Desktop Mode, double-tap or double-click one of the following:
- Re-image Steam Deck
- This performs a full factory reset – all user info, installed games, applications, or operating systems will be wiped and replaced with stock SteamOS.
- Clear local user data
- This reformats the home partitions on your Steam Deck, which will remove downloaded games and all personal content stored on this Deck, including system configuration.
- Reinstall Steam OS
- This will reinstall SteamOS on the Steam Deck, while attempting to preserve your games and personal content.
- Recovery tools
- This opens a prompt with the ability to make changes to the Steam Deck boot partition.
- Re-image Steam Deck
- Follow the on-screen steps to reset Steam Deck.
After the reset is complete, your Steam Deck will be restored to its factory settings and you can set it up again as if it were new. Keep in mind that you will need to sign in to your Steam account and re-download any games or apps you had previously installed. It’s also a good idea to back up any important data before performing a system recovery to avoid losing anything important.