Skip to content
LogoTechnipages
LogoTechnipages
  • Topics
        • Android
        • Browsers
        • Gaming
        • Hardware
        • Internet
        • iPhone
        • Linux
        • macOS
        • Office
        • Reviews
        • Software
        • Windows
        • Definitions
        • All Recent Posts
  • Product Reviews
  • About

How to Set up a VPN in Windows

Mel HawthorneNovember 30, 2022 Comments (0)

Most VPN providers offer a desktop client for Windows, the main exception being mobile-only VPNs. If you’re experiencing issues with your VPN client or just don’t like it and want to try something different, you may be able to configure your VPN natively in Windows.

To use the native Windows 7 VPN client, your VPN provider needs to support doing so. They need to support at least one of the following protocols: PPTP, L2TP/IPSec, SSTP, or IKEv2. These are required as they are the only supported protocols in Windows. Your VPN provider also has to be willing to give you VPN connection details.

How to Set up a VPN in Windows 7

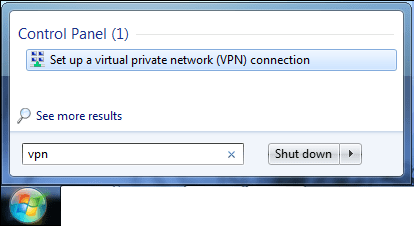
Open the VPN configuration tool, press the Windows key, type “Set up a virtual private network (VPN) connection” in the search bar, and hit enter. Alternatively, you can open Control Panel, search for “VPN,” then click “Set up a virtual private network (VPN) connection.”

Search for “Set up a virtual private network (VPN) connection.”

In the “Create a VPN connection” window, enter the IP address or URL of the VPN server in the “Internet address” box. You can enter any name in the “Destination name” box, as this is only used to identify the VPN connection.

Before you click “Next,” ensure you tick the “Don’t connect now; just set it up so I can connect later” checkbox. Always configure your VPN before you connect it, just if things don’t work as they should!

Search for “Set up a virtual private network (VPN) connection.”

The next screen asks you to configure the credentials that you will use to connect to the VPN. If you leave this blank, you’ll be asked to configure it when you first connect to the VPN. Click “Connect” to complete the creation process.

Connect to the VPN, open Control Panel to the Network Connection page at “Control Panel\Network and Internet\Network Connections.” Then find your VPN connection, and double-click it. You’ll be asked to provide your credentials; if you didn’t configure them earlier, your VPN should connect once you’ve entered them.

If the VPN doesn’t connect automatically, the automatic VPN protocol detection probably failed. You can manually configure this by right-clicking on the VPN in the Network Connections page before selecting “Properties” from the drop-down box.

Right-click on the VPN in the “Network Connections” page to configure its properties again.

In the VPN Connection Properties window, you can specify the protocol via the “Type of VPN” box in the Security tab. If your VPN provider specifically lists any manual VPN configuration settings, you can also apply them in this window. Once you’ve made any required changes, press “OK” to save and try to connect again.

Categories: Internet

Author Mel Hawthorne

You Might Also Like

  • facebook-post-anonymously

    How to Quickly Save Facebook Posts to Read Later

    Judy SanhzInternet
  • fix-google-meet-not-working-chromebook

    Google Meet: How to Quickly Add and Remove a Profile Picture

    Judy SanhzInternet
  • google-maps-location

    Google Maps: How to Find Traffic Jams in Your Area

    Judy SanhzInternet
  • Auto-Refresh-Chrome-Tab-Without-Extension

    Chrome: How to Turn off Search Suggestions

    Judy SanhzInternet

Leave a Reply

Your email address will not be published. Required fields are marked *

average laptop lifespan

What Is an Average Laptop Lifespan?

fix 0x80070302 windows update error

How to Fix the 0x80070302 Windows Update Error

how to allocate more memory to a program

How to Allocate More Memory to a Program in Windows

marvel rivals memory leak fix

Marvel Rivals Using Too Much Memory – How to Fix

how to create a macro in word

How to Create a Macro in Word

profile pic

The Experts Behind Technipages

My name is Mitch Bartlett. I've been working in technology for over 20 years in a wide range of tech jobs from Tech Support to Software Testing. I started this site as a technical guide for myself and it has grown into what I hope is a useful reference for all.

Learn More

technipages logo white
linkedin icon

Technipages is part of Guiding Tech Media, a leading digital media publisher focused on helping people figure out technology. Learn more about our mission and team here.

© 2025 Guiding Tech Media All Rights Reserved

  • About Us
  • Contact
  • Legal & Privacy

© 2025 Guiding Tech Media All Rights Reserved

Information from your device can be used to personalize your ad experience.
Do not sell my personal information.

Last Updated on November 30, 2022 by Mitch Bartlett