
Thanks to the two-factor authentication feature, you can enjoy an extra layer of protection. Since it does require an additional step to sign into your social media accounts, you might be a little reluctant to enabling this feature. Who doesn’t want to access their social media accounts as soon as possible, right?
If you decide that you want to give this security feature a try, I’m sure you’ll be happy to know that setting it up is very easy. It’s also quick and is automatically enabled once you complete the last step.
You can find all sorts of great content on Pinterest, and that includes the two-factor authentication To enable this feature go to Settings and click on the Security. Enable the Require code at login option, enter your password and select next.
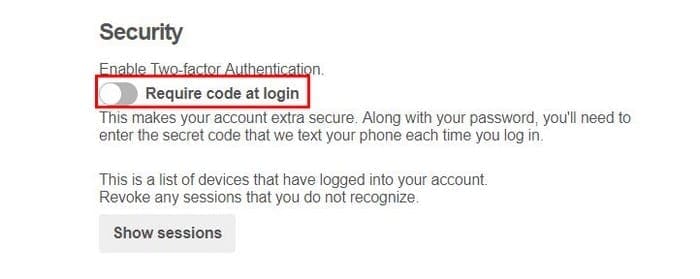
You should get a security code sent to your phone, and that the code Pinterest will be asking you for. Once you’ve entered it click on Verify and the two-factor authentication should now be enabled.
The most famous social network out there also has this security feature. First, click on the drop-down menu on the top right and click Settings. Click on Security and log in at the top left.

Scroll down slightly until you see the ¨Use two-factory authentication feature and click on the edit button to the right.

If you haven’t already added your phone number, go ahead and do so now. If you already have a number but just disabled the feature, just click on the Enable option at the bottom right of the option. You can either choose to add a phone number or a security key and a code generator, you decide.
Snapchat
To enable the feature on Snapchat tap on the ghost icon located at the bottom of your screen and tap on Settings. Look for Login Verification and choose Continue.

You can either choose to have a code sent to your phone or to verify through an Authentication app. If you select the app, you’ll need to create a code that you will later have to enter.
If you’re looking for a job, then there is a good chance that you have a LinkedIn account. The information you have on your profile is pretty sensitive data and the more security measures you have, the better.
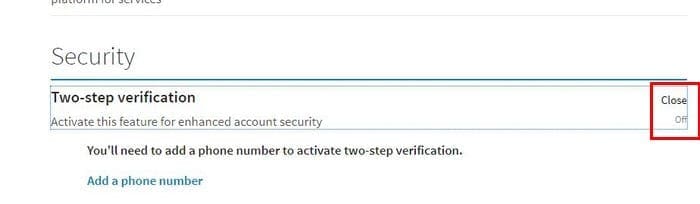
To enable the two-step verification go to LinkedIn’s Settings and click on the Privacy Tab. The security will be all the way at the bottom and when you find it, click on the off option. Enter your phone number and enter the code the LinkedIn sent you. Once you’ve clicked on verify the two-factor authentication will be enabled.
With over 800 million users, you can bet that Instagram could also be the target of an attack. In that case, setting up the two-factor authentication is a very good idea. Once you ‘ve opened the app tap on the profile icon (the last one to the right) and tap on the three vertical dots.

Swipe down to two-step authentication and toggle on Require Security Code. Enter your phone number and enter the code you receive.
Yes, Twitter also offers this great security measure to its users. Directly go to Twitter’s Settings and scroll down slightly to the Security section.
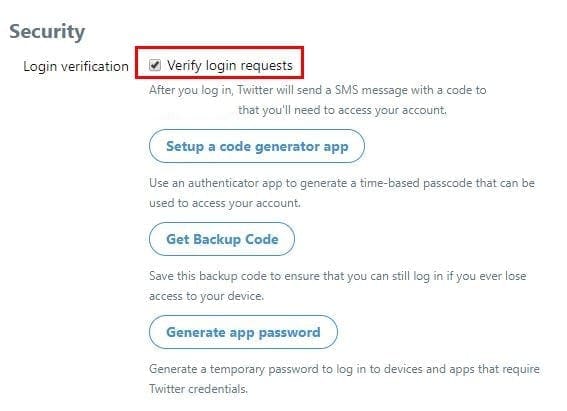
Click on the Verify login requests box, and if you haven’t done so already, you’ll need to enter a phone number. Just like the other social network, you’ll get a code to enter so the two-factor authentication can be enabled.
Google+
It may not come as much of a surprise that Google+ also has the two-factor authentication. Google does a great job of reminding you to enable the feature over and over again. If you think you’re ready to allow it, click on your profile picture and choose My Account.
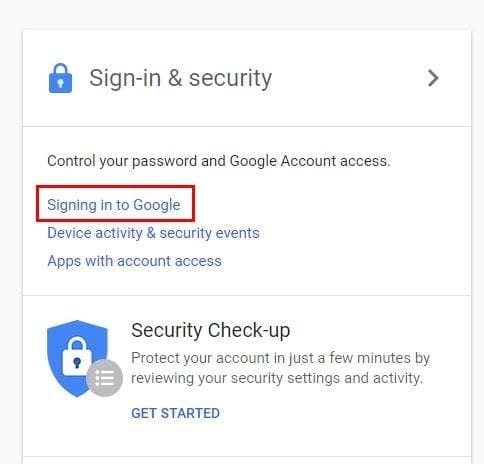
Click on the Signing into Google option and look for the two-step authentication option. Click on the Off option and then on the Get started option. After entering your password click on the Try it now option at the bottom right (in the blue box).
You should see a prompt asking you if you’re trying to sign in, tap Yes and get ready to receive a code. Click on the Send button and enter the code you get. Once you’ve done, you’ve successfully set up the security feature.
Conclusion
Now that you know how to set up the two-factor authentication on all the popular social networks, you have no excuse not to at least give it a try. Your information will be safer, and that’s worth the extra sign in step you have to go through. Do you think you’ll set it up? Leave a comment and share your opinion with me.


thank you for your time in helping me with some great tips and advise working on the PC. Please carry on if you can.