Skip to content
LogoTechnipages
LogoTechnipages
  • Topics
        • Android
        • Browsers
        • Gaming
        • Hardware
        • Internet
        • iPhone
        • Linux
        • macOS
        • Office
        • Reviews
        • Software
        • Windows
        • Definitions
        • All Recent Posts
  • Product Reviews
  • About

Linux Mint: How to Add a New User

Mel HawthorneDecember 11, 2020 Comments (1)

Having multiple people using a single computer can cause some potential issues. For example, if your family is all using a single home computer and sharing a single user account, then someone might delete someone else’s file when they’re trying to clear some space on the hard drive. It’s also entirely possible that you don’t want everyone to have the administrative powers required to perform certain actions, such as installing software.

The way to manage these risks and give people different permissions sets is to create multiple user accounts. Creating a new account in Linux Mint is easy; to be able to do so, press the Super key, then type “User and Groups” and hit enter.

Tip: The “Super” key is the name that many Linux distributions use to refer to the Windows key or the Apple “Command” key while avoiding any risk of trademark issues.
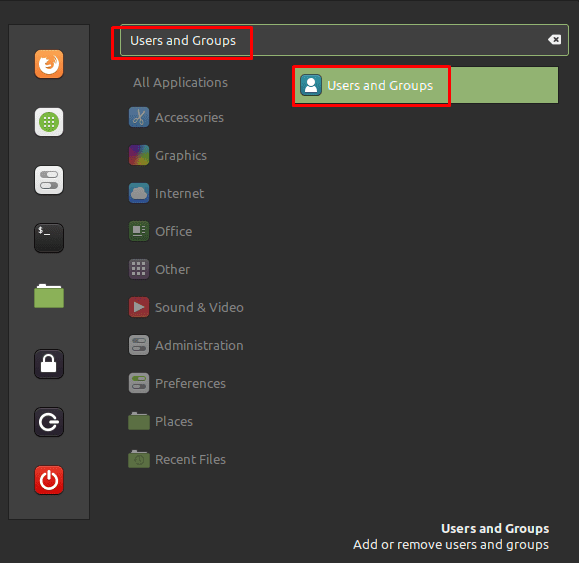
Press the Super key, then type “User and Groups” and hit enter.

How to Create a New User

As managing the list of users is a sensitive task, only administrative users with Sudo permissions will do so. You will need to immediately provide your account password to gain access. Once you’ve authenticated successfully, you’ll see the current list of users. To add a new user, click the “Add” button in the bottom-left corner.
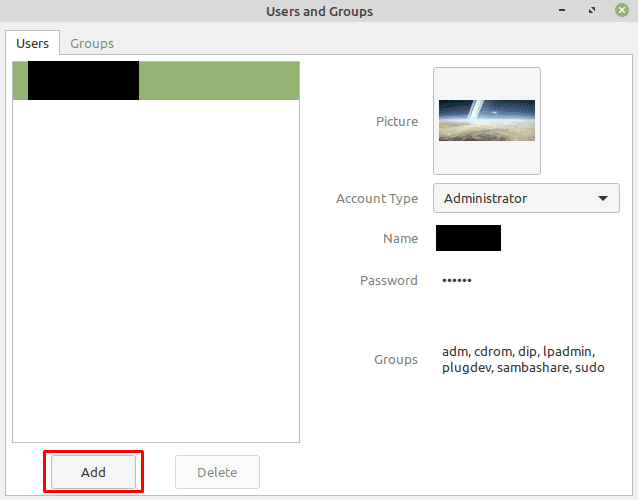
Once you’ve authenticated, click “Add” in the bottom-left corner to add a new user.

In the account creation screen, there are three fields you need to complete. The first is “Account Type,” “Standard” is a normal user account, whereas “Administrator” has Sudo permissions. “Full Name” is where you set the account’s vanity name; this is seen primarily on the user selection list of the login screen. The “Username” is your actual account name that will be used for creating your user directory.  Once you’ve set all three values, click “Add” in the bottom-right to create the account.
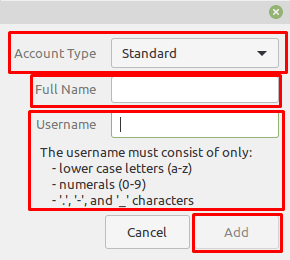
Set the “Account Type,” Full Name,” and “Username,” then click “Add” to create an account.

Once you’ve created the account, you can then review it in the user list. By default, newly created user accounts don’t have a password set at all. To add a password, click on “No password set” to open the password creation window. Here you simply need to enter the password you want to use twice, then click “Change.”
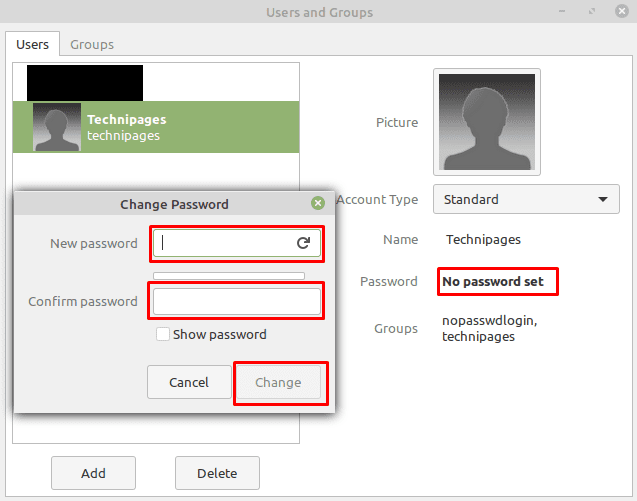
To set a password, click “No password set,” then enter the password you want to use, and click “Change.”

You can also change the profile picture, account type, full name, and which groups the user is a member of by clicking on the respective options.
Categories: Linux

Author Mel Hawthorne

You Might Also Like

  • Linux Mint: How to Configure the Menu Applet

    Mel HawthorneLinux
  • Linux Mint: How to Prevent the Screensaver From Locking the Computer

    Mel HawthorneLinux
  • Linux Mint: How to Create New Custom Keyboard Shortcuts

    Mel HawthorneLinux
  • Linux Mint: How to Select and Configure an Audio Device

    Mel HawthorneLinux

Comments

  1. Charlie says:
    July 16, 2021 at 8:59 am

    Great perfect information

Leave a Reply

Your email address will not be published. Required fields are marked *

how to create a macro in word

How to Create a Macro in Word

how to set video as screen saver

How to Set a Video as Your Screen Saver on Windows 11

how to fix 0xc000007b Error

Error 0xc000007b – What Is It and How to Fix It

0x80070024 media is write protected

What to Do When You See the 0x80070024 Media Is Write Protected

pivot table isnt working

My Pivot Table Isn’t Working – Five Possible Fixes

profile pic

The Experts Behind Technipages

My name is Mitch Bartlett. I've been working in technology for over 20 years in a wide range of tech jobs from Tech Support to Software Testing. I started this site as a technical guide for myself and it has grown into what I hope is a useful reference for all.

Learn More

technipages logo white
linkedin icon

Technipages is part of Guiding Tech Media, a leading digital media publisher focused on helping people figure out technology. Learn more about our mission and team here.

© 2025 Guiding Tech Media All Rights Reserved

  • About Us
  • Contact
  • Legal & Privacy

© 2025 Guiding Tech Media All Rights Reserved

Information from your device can be used to personalize your ad experience.
Do not sell my personal information.

Last Updated on December 11, 2020 by Judy Sanhz