
If you want to transfer files to and from the Nexus 5X smartphone using your PC, here is a tutorial to assist you.
If you purchased your Nexus 5X from Google, you’ll quickly notice that they ship the device without a cable that connects to your computer. It only comes with the USB-C cable and the power adapter.
Option 1 – Physical Cable Connection
You have a couple of options for physically connecting the device to your PC.
- Obtain an adapter that will allow an existing Android Micro USB cable to work with the USB-C port on your Nexus 5X.
- Obtain a separate cable that connects a USB-C device to a USB-A port on the PC.
Once you have one of the above items, follow these steps.
- Plug the cable into your Nexus 5X and the PC. If you are using a Mac, download and install Android File Transfer.
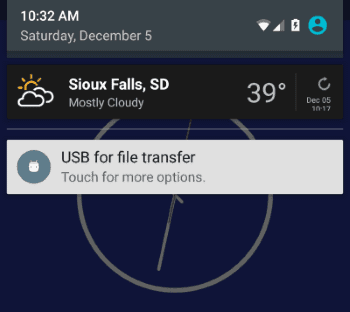
- Swipe down the notification area on the 5X, and select “USB for file transfer”

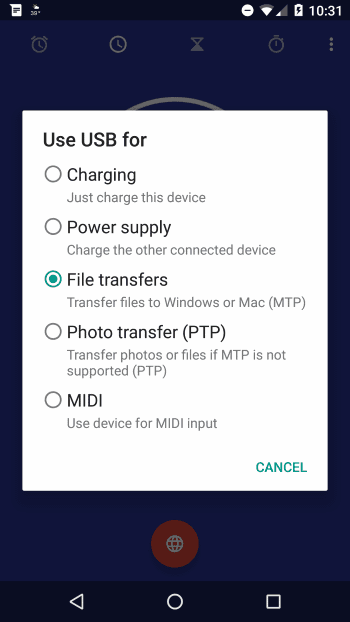
- Select “File transfers“.

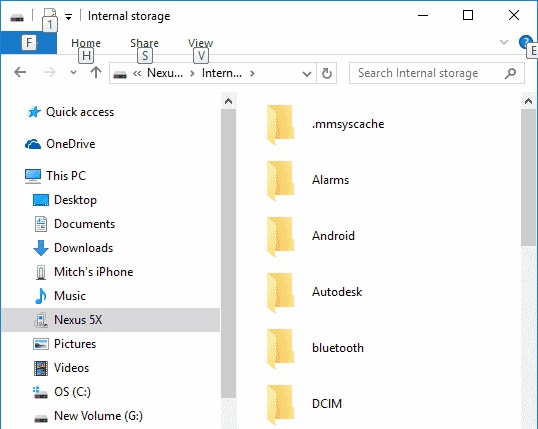
- A “Nexus 5X” option should appear under File Explorer (Windows). Open it, and there will be an option for “Internal Storage” where you can transfer files between your PC and device. MacOS users can open Android File Transfer.

Option 2 – Bluetooth Connection
This option is not recommended for transferring a large amount of files as it is rather cumbersome. But it will work for a few files.
- On the 5X, open “Settings” > “Bluetooth” and ensure it is turned “On“, and make your device visible/discoverable.
- Connect to the 5X from your device. In Windows 10, you can go to “Start” > type “Bluetooth” > “Bluetooth settings“. Select the Nexus 5X, then Pair and Connect to it.
- Now you can transfer files to the device. In Windows 10, you can go to “Start” > type “Bluetooth” > “Bluetooth File Transfer Wizard” to send or receive files.


My device does not provide a notification. In that case, after plugging in the device to your PC via a data USB cable:
1. Navigate on your Nexus to Settings > Connected Devices > USB > Transfer Files
2. Navigate on PC to device > double-click Internal Share Storage > DCIM > Camera
3. Select images & copy as usual.
I cannot get a usb icon on my Nexus 5X. I have tried connecting the cable on both laptop usb slots, cable first and last, computer first and after phone and vs.. I have done it with the phone top bar closed, open, and full screen, no usb icon, it just slow charges -any ideas, please?
I just got a Nexus 5X and bought a 5X to PC cord on Amazon and used your instructions to transfer some files and while looking at Windows 10 programs I stumbled on “Phone Companion.” A program (app?) that is on the Windows 10 main menu. It does just about everything I need to do seamlessly.
Thanks I just used this with my LG Google Nexus 5X phone to my windows PC. Worked great except that for some reason when I made a backup with the app Noteeverything Pro the zip file was invisible to the windows computer until I renamed the file on the phone with ES File explorer. I could put the name back to what it was and suddenly is shows up in windows explorer.