Marvel Rivals has taken the gaming world by Storm (pun intended). But some gamers are experiencing an issue where their supposedly higher-end PCs can’t run the game because they keep running out of memory. Many have called the issue a memory leak, but there are several possible reasons why it might happen.
Here are the best Marvel Rival memory leak fix options and other recommendations to enhance your gaming sessions.
Contents
- 1 Fix 1 – Use the Windows 8 Compatibility Mode
- 2 Fix 2 – Changing the In-Game Graphics Settings to Fix Marvel Rivals Video Memory Error
- 3 Fix 3 – Fix Marvel Rivals Memory Error through Windows Settings
- 4 Fix 4 – Update Video Drivers and Clear the Cache
- 5 Fix 5 – Increase Your Virtual Memory and RAM Size
Fix 1 – Use the Windows 8 Compatibility Mode
For some reason beyond our understanding, running the game in compatibility mode forces some of the settings to be toned down, which ultimately can help reduce memory load.
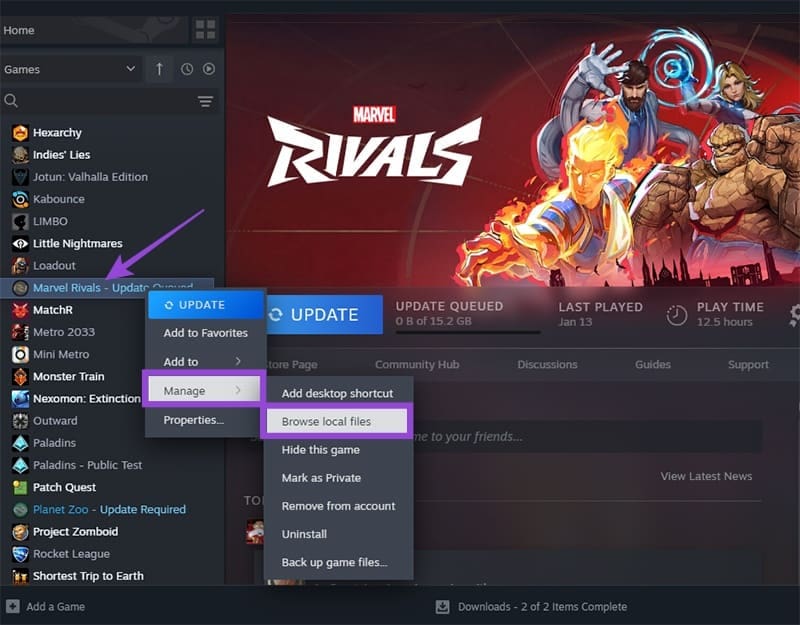
Step 1. Go to the actual folder where the game is stored. If you’ve downloaded the game through Steam, you can find it via the Steam Library. Right-click on the game, select “Manage” and choose “Browse local files.”
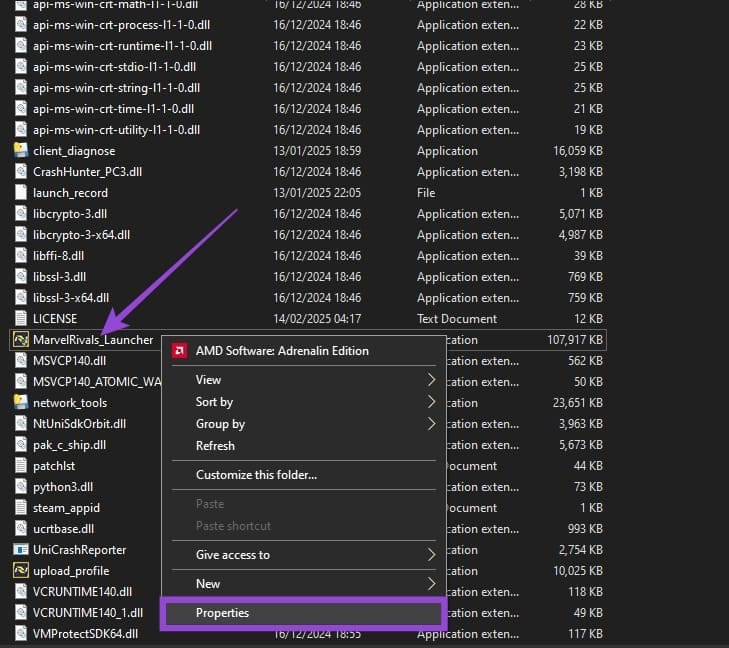
Step 2. In the folder, scroll down and right-click on “MarvelRivals_Launcher,” then select “Properties.”
Step 3. In the pop-up window, select the “Compatibility” tab, check the “Run this program in compatibility mode for” box, and select “Windows 8” from the list of options.
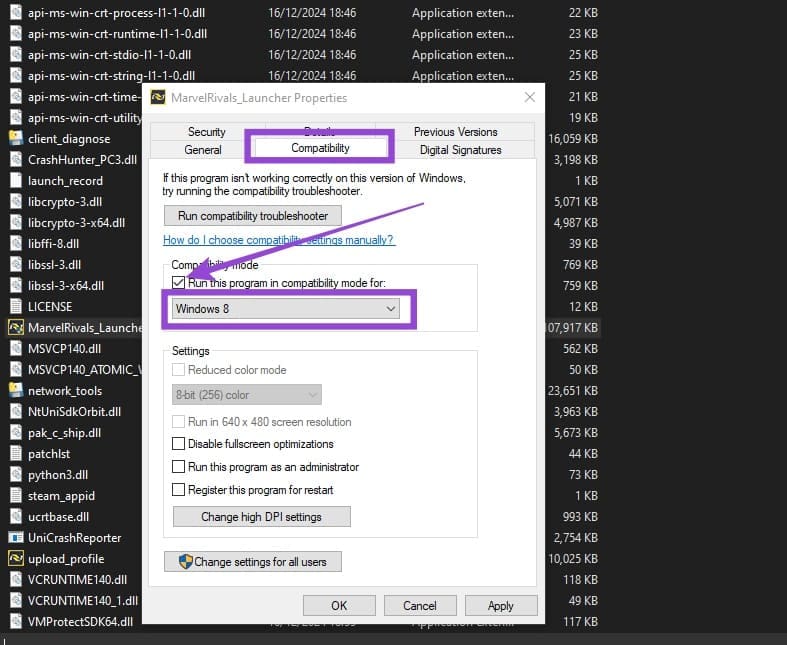
Step 4. Click on “Apply,” then start the game.
This might not fix the issue for everyone, and if it doesn’t work for you, you can undo the changes to avoid possible issues in the future.
Fix 2 – Changing the In-Game Graphics Settings to Fix Marvel Rivals Video Memory Error
The game needs to load a huge amount of assets into the memory, such as skins, and their quality can affect how much storage it can take. However, other graphics settings can influence the graphics load and potentially allow you to eke out performance.
Step 1. Open the game.
Step 2. Press “Escape” and select Options.
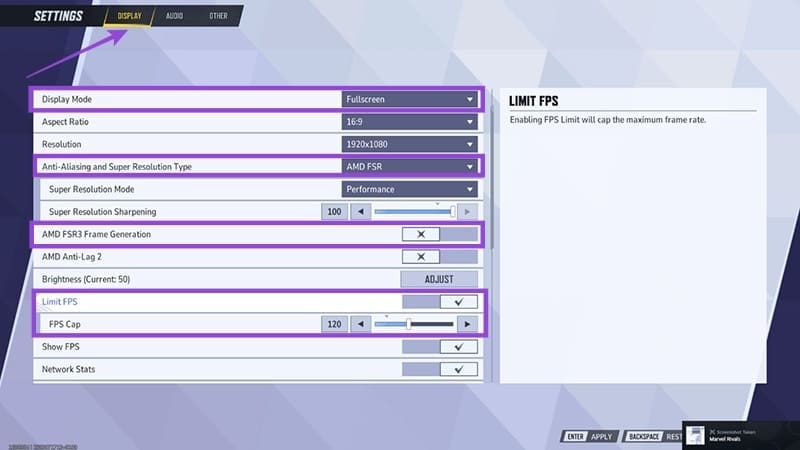
Step 3. In the “Graphics” settings, make the following changes:
- Display mode: Fullscreen
- Anti-aliasing: Switch to FXAA or disable it
- Frame generation is hit or miss, so you can check if disabling or enabling works better.
- Turn on Limit FPS and set the FPS Cap to 120 at most
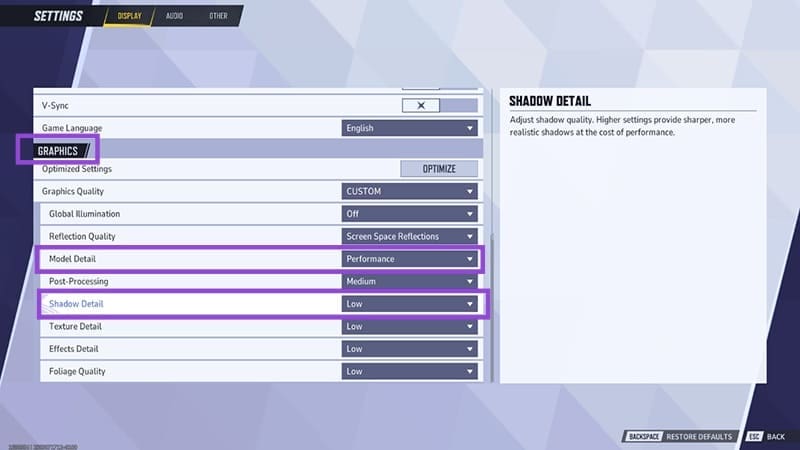
Step 4. Scroll down to the “Graphics” section and choose “CUSTOM” for the Graphics Quality. Then, set the “Model Detail” setting to “Performance.”
Step 5. Lower shadow and texture details, as these affect RAM usage the most.
Step 6. Press “Escape” to accept the changes, then restart the game.
Fix 3 – Fix Marvel Rivals Memory Error through Windows Settings
You can also disable a few OS settings (available on Windows 11) that force the GPU to work overtime when working on demanding programs.
Step 1. Open Settings, go to the System tab, then choose Display.
Step 2. Under “Related settings,” choose “Graphics.”
Step 3. Find Marvel Rivals from the list of apps or add it via the “Add an app” button.
Step 4. In the settings, disable Auto HDR and hardware-accelerated GPU scheduling. If you don’t see the option, your graphics card doesn’t support the feature or you’re using an older Windows 11 build. Hardware-accelerated GPU scheduling might be available if you click “Change default graphics settings” above the app list.
Step 5. In the same window, set the GPU preference to “High Performance.”
Fix 4 – Update Video Drivers and Clear the Cache
You should have an app dedicated to managing your graphics settings. For NVIDIA GPUs, this is the NVIDIA app. For AMD GPUs, it’s called AMD Adrenaline. Both apps should be running in the background at all times.
Find the app in your taskbar, open it, and choose “Update drivers” or “Update app version.” This should bring your GPU’s drivers to the most recent version, which can fix older issues and suboptimal settings.
Some users have also suggested rolling back a driver if you’ve recently updated them. You can do this by going to your GPU manufacturer’s page, entering the “Download” section, and manually selecting the second-newest option (or an older one).
NVIDIA graphics also have a cache that has been known to cause memory leaks. You can usually find it at C:>Users>[your user profile]>AppData>LocalLow>NVIDIA>DXCache. Clear the contents of the folder and restart your PC, at which point the app will automatically redownload them.
Fix 5 – Increase Your Virtual Memory and RAM Size
You can try to increase your virtual memory (parts of the hard drive the PC uses as if it were RAM), which can alleviate issues by pushing programs to the background.
Step 1. Right-click on “This PC” and select “Properties.”
Step 2. Choose “Advanced system settings.”

Step 3. In the “Performance” section, click on “Settings.”
Step 4. Go to the “Advanced” tab and select “Change” in the “Virtual memory” section.

Step 5. Uncheck the box at the top, then select the drive you want to use (we recommend an SSD that doesn’t store the OS files). Then, change the “Minimum” value to be above the one previously listed and put the “Maximum” value to double that. Don’t go over the “Space available” as that will cause more issues.

Step 6. Click on “Set,” then OK through the windows and restart your PC.