Skip to content
LogoTechnipages
LogoTechnipages
  • Topics
        • Android
        • Browsers
        • Gaming
        • Hardware
        • Internet
        • iPhone
        • Linux
        • macOS
        • Office
        • Reviews
        • Software
        • Windows
        • Definitions
        • All Recent Posts
  • Product Reviews
  • About

Linux Mint: How to Configure the Formats for Display Numbers, Dates, and Times

Mel HawthorneDecember 18, 2020 Comments (2)

Around the world, different countries have different ways of formatting numbers, dates, and times. Configuring your computer to use your preferred formatting is a helpful part of setting up your computer.

In Linux Mint the main way to change these settings is in the language settings. To manage these settings, press the Super key, then type “Languages” and hit enter.

Tip: The “Super” key is the name that many Linux distributions use to refer to the Windows key or the Apple “Command” key, while avoiding any risk of trademark issues.

Press the Super key, then type “Languages” and hit enter.

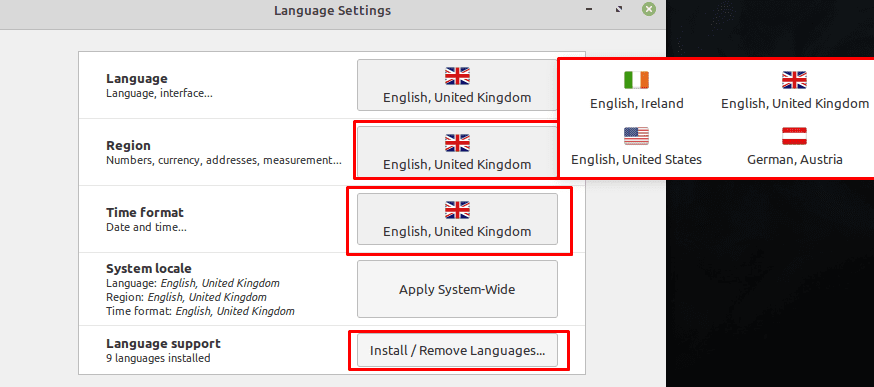
In the languages settings, you can configure Linux Mint to follow your country’s standard number formatting by selecting your country from the “Region” list. If you also select your country for the “Time format” Mint will use your country’s standard date and time formatting.

Tip: If your country is not present in those lists, you need to click “Install / Remove Languages” at the bottom of the page. To read our full guide covering how to add a language pack, click here.

Select your country in the “Region” and “Time format” settings to default to your country’s standard formatting system.

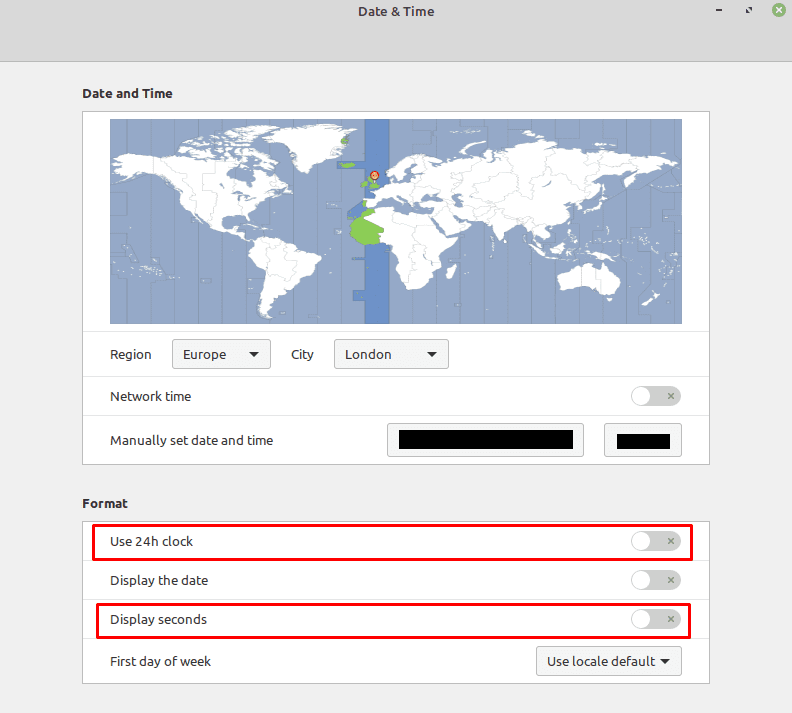
You may prefer to use a 12- or 24- hour clock or for seconds to be displayed on your clock, even if that isn’t enabled with your country settings. To manage these settings, press the Super key, then type “Date & Time” and hit enter. In the date and time settings, click the “Use 24h clock” slider to toggle between 12- and 24-hour clocks. You can also toggle the clock displaying seconds by toggling the “Display seconds” slider.

You can choose between a 12- and 24-hour clock and if the seconds are shown or not.

Completely custom date and time formatting

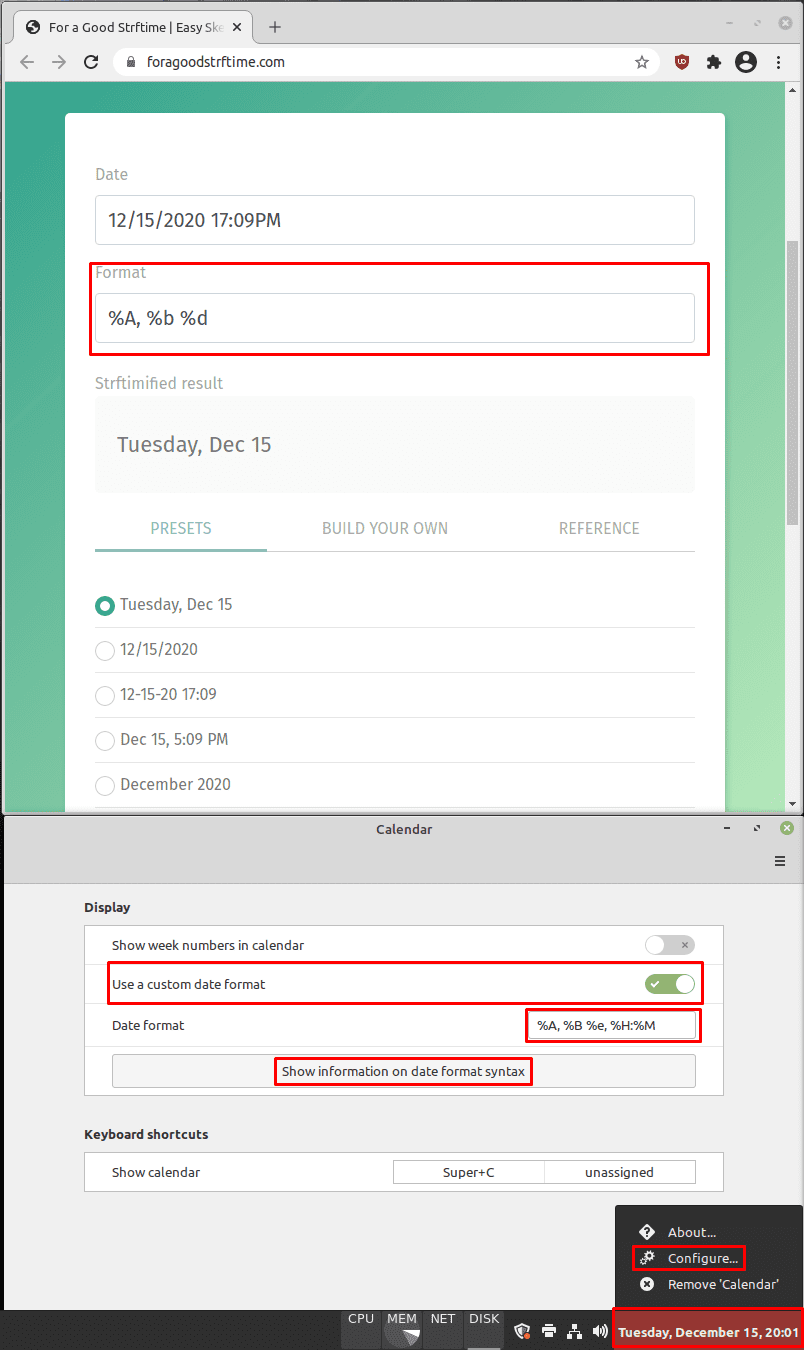
If you want to customise the appearance of the clock further, you need to right-click on the clock/calendar applet in the bottom-right corner, then click “Configure”. In the calendar settings, click the “Use a custom date format” slider to the “On” position, then click on “Show information on date format syntax”. In the webpage, that opens, configure the clock appearance you want, then copy the string in the “Format” box and paste it into the “Date format” box in the calendar settings.

You can completely customise the format of the clock if you want although this only applies to the clock/calendar applet.

Categories: Linux

Author Mel Hawthorne

You Might Also Like

  • Linux Mint: How to Add New Desklets

    Mel HawthorneLinux
  • Linux Mint: How to Adjust Mouse Sensitivity

    Mel HawthorneLinux
  • Linux Mint: How to Configure the Power Management Options

    Mel HawthorneLinux
  • Twitch.tv: How to Add a Profile Picture and Banner

    Mel HawthorneLinux

Comments

  1. kona says:
    November 12, 2022 at 1:46 pm

    T Sarbin is correct.

  2. T Sarbin says:
    April 11, 2022 at 11:39 am

    Just tell me what the codes are. This page was useless.

Leave a Reply

Your email address will not be published. Required fields are marked *

marvel rivals memory leak fix

Marvel Rivals Using Too Much Memory – How to Fix

how to create a macro in word

How to Create a Macro in Word

how to set video as screen saver

How to Set a Video as Your Screen Saver on Windows 11

how to fix 0xc000007b Error

Error 0xc000007b – What Is It and How to Fix It

0x80070024 media is write protected

What to Do When You See the 0x80070024 Media Is Write Protected

profile pic

The Experts Behind Technipages

My name is Mitch Bartlett. I've been working in technology for over 20 years in a wide range of tech jobs from Tech Support to Software Testing. I started this site as a technical guide for myself and it has grown into what I hope is a useful reference for all.

Learn More

technipages logo white
linkedin icon

Technipages is part of Guiding Tech Media, a leading digital media publisher focused on helping people figure out technology. Learn more about our mission and team here.

© 2025 Guiding Tech Media All Rights Reserved

  • About Us
  • Contact
  • Legal & Privacy

© 2025 Guiding Tech Media All Rights Reserved

Information from your device can be used to personalize your ad experience.
Do not sell my personal information.

Last Updated on December 18, 2020 by Mitch Bartlett