

Are you getting the “Outlook rules are not supported for this account error?” Find out the proven solutions to the infamous Outlook rules not working issue.
Outlook has become a popular email client because of its unique features. One such feature is Outlook rules. These rules are automatic actions that can be applied to your incoming or outgoing emails on Outlook.
By creating and implementing rules in Outlook, you can make your Outlook inbox more efficient and streamlined. Furthermore, a few automated rules can make Outlook emails and attachments management a walk in the park. For instance, all work emails CC’d to you go to a medium importance folder whereas those with your email address in the To field go to the urgent folder.
There are numerous other tasks that can be automated with Outlook rules. These let you stay productive and up-to-date without any distractions. But what if you suddenly start getting Outlook rules-related warnings, like “Outlook rules are not supported for this account?”
Sounds frustrating, right? But, there’s no need to worry as here, I’ll tell you how to resolve this problem so you can continue having an efficient Outlook mailbox.
Contents
- 1 Outlook Rules Are Not Supported for This Account: Reasons
- 2 How to Resolve “Outlook Rules Are Not Supported for This Account”: Windows 11
- 2.1 1. Enable Outlook Rules by Outlook Admin
- 2.2 2. Enable Specific Rules That Aren’t Working
- 2.3 3. Rename the Rule
- 2.4 4. Reset or Rename the SRS File
- 2.5 5. Activate Cached Exchange Mode
- 2.6 6. Update Outlook to Latest Version
- 2.7 7. Disable Stop Processing More Rules
- 2.8 8. Uncheck This Computer Only Feature
- 2.9 9. Delete the OST File
- 2.10 10. Reset All Rules and Create New Ones
- 3 How to Resolve “Outlook Rules Are Not Supported for This Account”: macOS
- 4 Conclusion
Outlook Rules Are Not Supported for This Account: Reasons
Find below the common reasons for Outlook rules-related issues on Windows 11 and macOS devices:
- Your Outlook email is from work and the Outlook admin didn’t allow Outlook rules
- The Outlook organization admin disabled Outlook rules recently
- Microsoft stopped supporting client rules in the new Outlook for Mac app
- Outlook rules created on desktop clients won’t be available on Outlook Web App or Outlook on the Web
- The POP4 and IMAP configuration is faulty or the service provider changed the configuration recently
- Shared mailboxes don’t allow Outlook rules
- The Outlook rules on your Outlook profile are set to run on a specific client computer
- Outlook files like SRS and OST got corrupted
How to Resolve “Outlook Rules Are Not Supported for This Account”: Windows 11
There are many different techniques to fix the Outlook rules not working issue. Try the following methods and give the rules a try after each method. These troubleshooting methods are also valid for Windows 10, 8, 7, and Vista.
1. Enable Outlook Rules by Outlook Admin
The most reported cause for the “Rules are not supported for this account” is Outlook admin settings. Most organizations may disallow subordinate employees from using Outlook rules. Because Outlook rules are one of the many ways hackers access organization servers and sell server data on the dark web.
Also read: Deep Web Vs Dark Web: Learn the Differences
Thus if you’re seeing the above error on the very first day of employment or sometime later on the job, the Outlook server admin must have disabled the feature. Contact the admin to raise a request for Outlook rules.
2. Enable Specific Rules That Aren’t Working
There’s a checkbox beside all rules that you create on Outlook in the Rules and Alerts dialog box. You must checkmark all the rules that you plan to use regularly. Here’s how to enable or disable rules:
- Open the Outlook app and click the File tab.
- Now, select the Rules and Alerts option under the Account Information screen.
- In the Email Rules tab, you should see all active rules.
- Checkmark the checkboxes for all or a few rules.
- If the troubled rule was already checkmarked, uncheck the checkbox and check it again.
- Click Apply and then select OK.
3. Rename the Rule
Sometimes, due to corrupted cache files, certain complex rules may not work and show the “Outlook rules are not supported error.” You can resolve this by renaming the rule as explained below:
- Select the rule in question on the rules dashboard: Rules & Alerts.

- Click Change Rule on the top and then select Rename Rule.
4. Reset or Rename the SRS File
The SRS file of Outlook is also called the Send and Receive Settings file. Any code corruption in this file can disable the rules as well. You can follow these steps to recreate a fresh SRS file:
- Search for the Outlook.srs file in the Windows installation drive.
- Access the location of the file and rename it to Outlook.srs.old.
- Run the Outlook app now to recreate the Outlook.srs file.
5. Activate Cached Exchange Mode
Many Outlook app users reported that enabling the Cached Exchange Mode resolved the “Outlook Rules Are Not Supported for This Account” error. Here’s how it’s done:
- Open Outlook and click the File tab.
- Now, click Account Settings, and from the drop down list, again choose Account Settings.
- Under the Email tab, click Change.
- Click More Settings in the Server Settings screen and select Advanced.
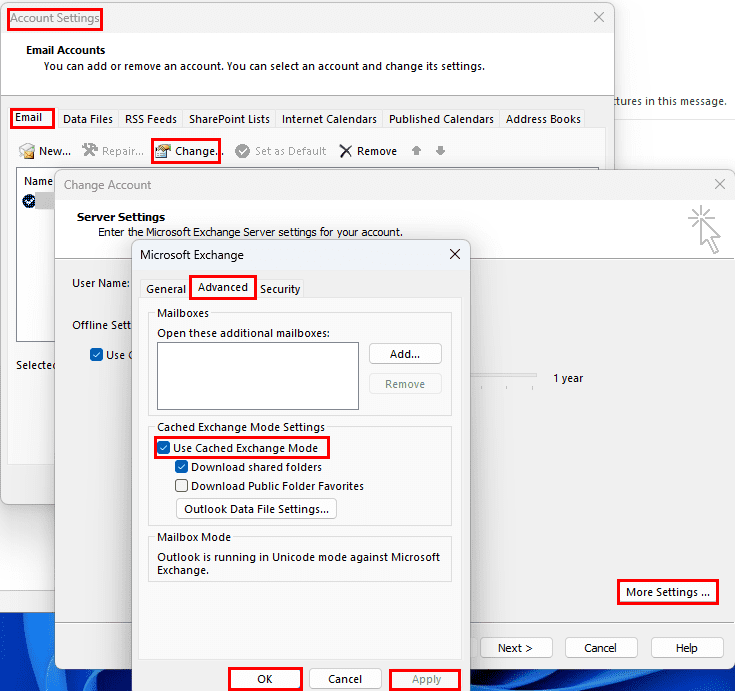
- Enable Cached Exchange Mode.
- Click Apply and select OK to save the changes.
6. Update Outlook to Latest Version
Another option for individual Outlook for Windows app users is updating the Outlook installation. Here’s how you can update the app:
- From the Outlook app Home Screen, click File and then go to Office Account.
- Select the Update Options drop down list and click Update Now.
7. Disable Stop Processing More Rules
When you created the rule, you might have selected a rule option that’s now preventing you from running the rule. Follow these quick steps to fix this issue:
- Select the rule in question on the Rules & Alerts window.
- Click Change Rule and then choose Edit Rule Settings.
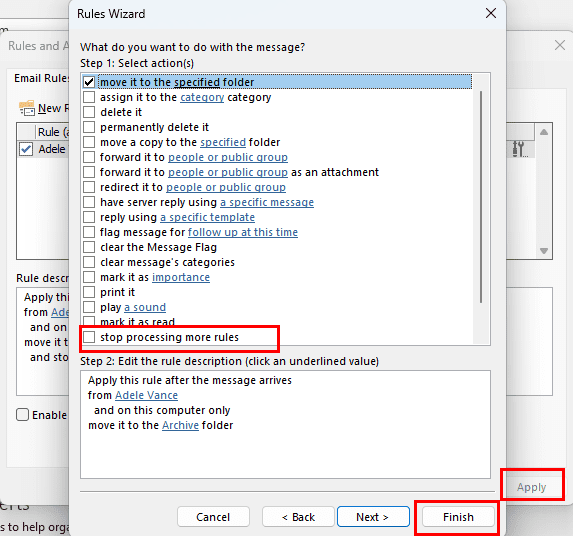
- Select Next and uncheck the option Stop processing more rules.
- Click Finish > Apply > OK to save the changes made just now.
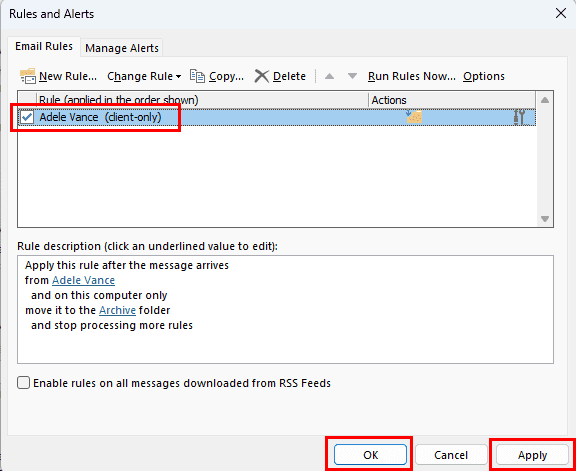
8. Uncheck This Computer Only Feature
Did you make client-based or computer-specific Outlook rules? That might stop you from using the same rule from another computer using your Outlook profile. First off, edit the rule to make this universal by following these quick steps:
- Go to Rules & Alerts in File > Account Information on the Outlook app.

- Double-click the troubled rule and uncheck the checkbox beside On this computer only.
- Don’t forget to press the Finish button and click Apply to make the modifications permanent.
9. Delete the OST File
You may also want to delete the OST file and let Outlook recreate it. This process often resolves the “Outlook rules are not supported” error. Since, a Windows 11 computer may contain more than one OST file, delete it carefully. Here’s how it can be done:
- Close Outlook app.
- Click the Windows flag or Start menu icon and type Control Panel.

- Open the Control Panel and select Mail, as shown in the image.
- In the pop-up box, select Email Accounts.
- Choose the Data Files tab and then select the right Outlook email.
- Now, just click the Open File Location button.

- Simply delete the pre-selected OST file.
- Run the Outlook app and let it sync and recreate the OST file.
10. Reset All Rules and Create New Ones
If none of the above is working, the final option is to delete all existing Outlook rules and recreate the rules from scratch. Thanks to the Outlook rules template library, you can create popular workplace rules by simply choosing the rules templates. To delete all rules in bulk, follow these steps:
- Hit the Windows + R keys together.
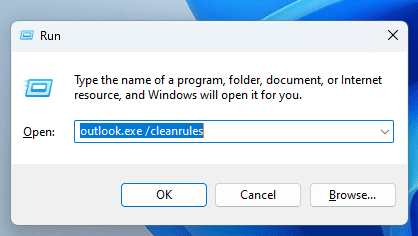
- Type the following command code in the Run box:
Outlook.exe /cleanrules
- Hit Enter.
- You’ll see the Outlook app splash screen for a while.
- Then, it’ll enter the Home Screen.
- Go to Rules & Alerts and you’ll find the dashboard empty.
- Create new rules using templates or start from scratch.
How to Resolve “Outlook Rules Are Not Supported for This Account”: macOS
Find below the troubleshooting steps you can try on your MacBook or iMac if you experience the “Outlook rules are not supported” error:
1. Revert to Legacy Outlook for Mac
In October 2020, Microsoft disabled the support for client rules on Outlook for Mac. This change only affects the new Outlook for Mac app. The new app will only support server rules for Outlook email receiving and sending automation.
If you were using the legacy Outlook app for Mac and transitioned to the new app recently, you’ll still see the client-only rules. But they won’t work. You must revert to legacy Outlook by following any of the steps mentioned below:
- Open the new Outlook for Mac app.
- Click the Help menu on the Mac toolbar.
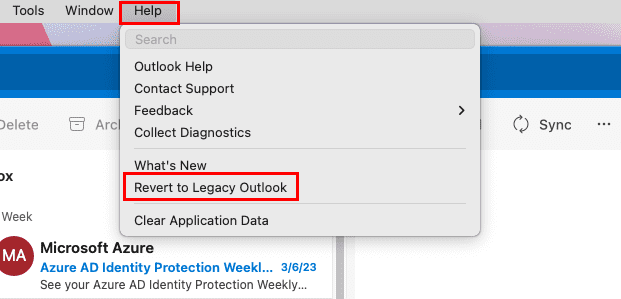
- Select Revert to Legacy Outlook on the context menu that shows up.
![]()
- Alternatively, click the Outlook menu on the Mac toolbar.
- Uncheck the New Outlook option.
Close the app and run it again. Now, you must be able to use your existing Outlook rules in the legacy app.
2. Force Stop Outlook for Mac App
If the above didn’t work, force-stop all of the app instances by following these steps:
- Click the Spotlight tool from the Mac toolbar on the top.
- Type in Activity and the Activity Monitor app will show up. Double-click this app.
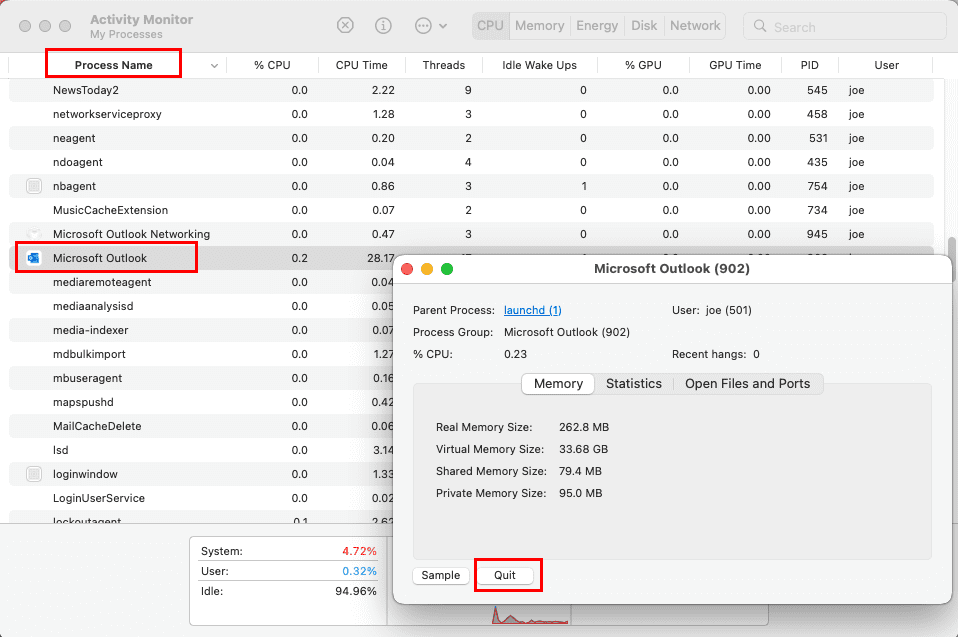
- Under the Process Name column, find Microsoft Outlook. Double-click the app and then select Quit.
- Repeat the above step for all other Microsoft programs and tasks.
- Now, open Outlook from Dock and see if the existing rules are working or not.
3. Delete and Recreate Rules
If none of the above troubleshooting is working for you, you can delete all existing Outlook rules and create new ones. Here are the steps you must try:
- Keeping the Outlook app selected, click the Tool menu on the Mac toolbar.
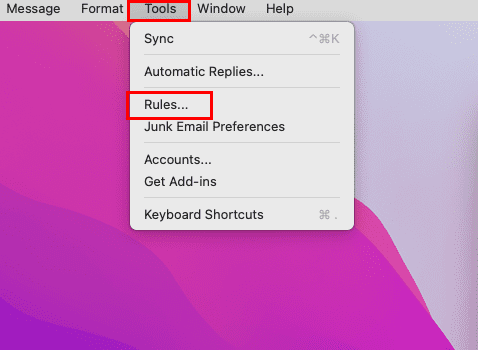
- In the context menu that shows up, select Rules.
- You should now see all existing Outlook rules.

- Click the Delete rule or trash at the right side of the rules to delete them one by one.
- Restart Outlook.
- Go to Rules and create new ones.
Conclusion
The ”Outlook rules are not supported for this account” is a common error encountered in Outlook. If you get this message, there is no need to panic. Just follow the methods mentioned above, and you should be able to continue using Outlook rules in no time.
In case I’ve missed any methods for this Outlook rules issue, do share that in the comment section. You can also share this article with your friends and followers on various social media. Up next, how to enable or disable Outlook mail notification box and Outlook email view changed.


So the only “fix” to resolve “Outlook Rules Are Not Supported for This Account”: macOS — is to “revert to the Legacy version”?
Seriously… this doesn’t sound like a fix; more like a bandage.
Why even bother upgrade if you can’t filter spam?