If you’re using a password manager, then access to your vault is almost always restricted by a master password. Your master password logs you into the online service and decrypts your vault data. Obviously, such a sensitive account needs to choose a unique, strong, and long password. This can, however, get annoying to type in. This will especially be the case if you set your vault to lock after a short period of inactivity, as you’ll have to type it a lot.
Bitwarden offers two alternative unlock methods for the browser extension. You can configure an unlock PIN or enable biometric unlock – on devices with supporting hardware. Before enabling either of these options, it’s important to understand that they will only work to unlock your vault, not login to it.
Tip: In case the distinction between login and unlock is unclear. Log in is when you use your email address and master password to authenticate to Bitwarden, download your encrypted data, and decrypt it. Unlock is where your vault data is already stored on your device. You just need to provide your master password to verify ownership and use the decryption key in memory from when you logged in. Unlocking your vault does not require an internet connection, whereas logging in does. As the decryption key is already stored in memory, alternative authentication methods can be used to unlock your vault.
How to Unlock Your Bitwarden Browser Extension with a PIN Code
To enable PIN code access in the Bitwarden browser extension, you need to open the extension pane. To do so, click on the Bitwarden extension icon, then switch to the settings tab. In the “Security” section, tick the “Unlock with PIN” checkbox.”
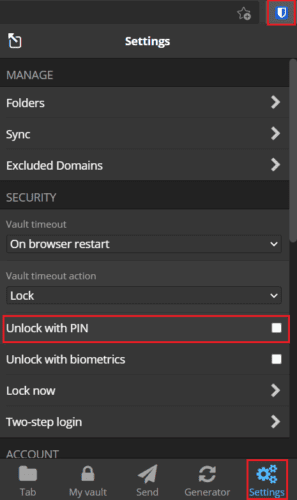
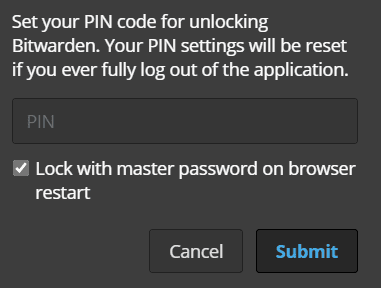
Once you tick the checkbox, a popup will appear, asking you to enter the PIN code you want to use. There aren’t any character restrictions on your PIN; you can use special characters if you want to. You’ll also see the pre-ticked checkbox labeled “Lock with master password on browser restart.” If you leave this option ticked, you will need to use your master password to unlock your vault if you restart the browser. If you disable it, you can continue to use the PIN code. Click “Submit” to enable the PIN code unlock.
One thing to note is that when you fully sign out of the browser extension, your PIN code setting will be reset and disabled. You will have to manually re-enable the feature if you want to use it again. This doesn’t apply if you need to use the master password to unlock the vault after a browser restart, as this is still just an unlock action.
How to Enable Biometric Unlocks
Biometric unlocks require you to have the standalone desktop version of the Bitwarden app installed. It supports any Windows Hello compatible hardware or Touch ID on MacOS. To enable biometric unlocks in the browser extension, you must first install the standalone desktop app, sign in, enable biometric support and enable browser integration. Chromium-based browsers are the only ones to currently support the feature.
Once you’ve got the desktop app configured, open the browser extension settings, then tick the “Unlock with biometrics option.” You may be prompted to allow the browser permission to “communicate with cooperating native applications.” This permission is safe to use. It only enables biometric authentication.
Tip: If you don’t want to allow the permission, you don’t need to; it is optional. You won’t be able to use biometrics to unlock your browser extension without it, however.
You can now see the “Unlock with biometrics” option in the extension pane.
Note: If you don’t see the option still, you may need to grant the extension permission to access file URLs. To do so, browse to your browser’s extension manager (e.g., chrome://extensions), click on the Bitwarden extension then enable the setting.

PIN codes and biometrics are two convenient unlock options that mean you don’t have to use your full master password to unlock your vault. By following the steps in this guide, you can enable PIN, and biometric unlock for the Bitwarden browser extension.