Skip to content
LogoTechnipages
LogoTechnipages
  • Topics
        • Android
        • Browsers
        • Gaming
        • Hardware
        • Internet
        • iPhone
        • Linux
        • macOS
        • Office
        • Reviews
        • Software
        • Windows
        • Definitions
        • All Recent Posts
  • Product Reviews
  • About

Windows 11: How to Disable Quick Searches

Madalina DinitaJuly 26, 2023 Comments (0)
Windows 10 Disable Quick Searches

Windows 11 users often find Quick Searches to be an infrequently used feature. In fact, many users would be happy to disable this seemingly bothersome function. However, locating a straightforward method to achieve this is not a simple task.

That’s precisely why we’ve developed this comprehensive guide. We’ll walk you through the necessary steps to disable Quick Searches on your computer effectively.

The method we propose entails utilizing the Registry Editor to remove Bing from Search, which will help eliminate Quick Searches.

Steps to Disable Windows 11 Quick Searches

  1. Go to the Windows search bar and type regedit.
  2. Double-click on the Registry Editor.
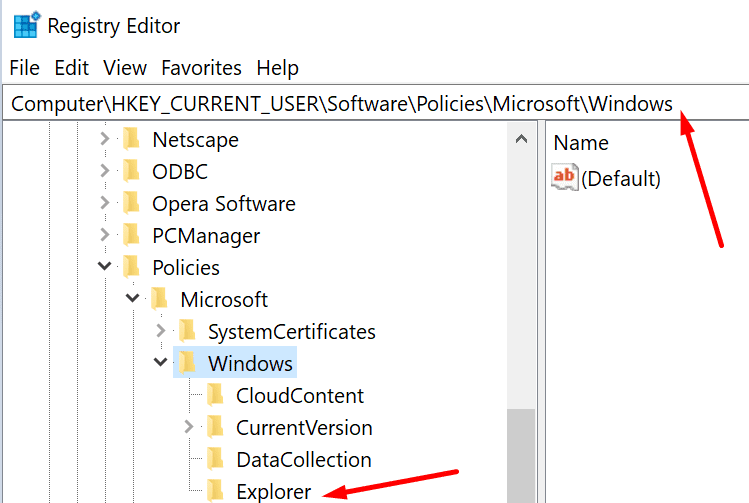
  3. Then navigate to the following path:
    • Computer
    • HKEY_CURRENT_USER
    • SOFTWARE
    • Policies
    • Microsoft
    • Windows
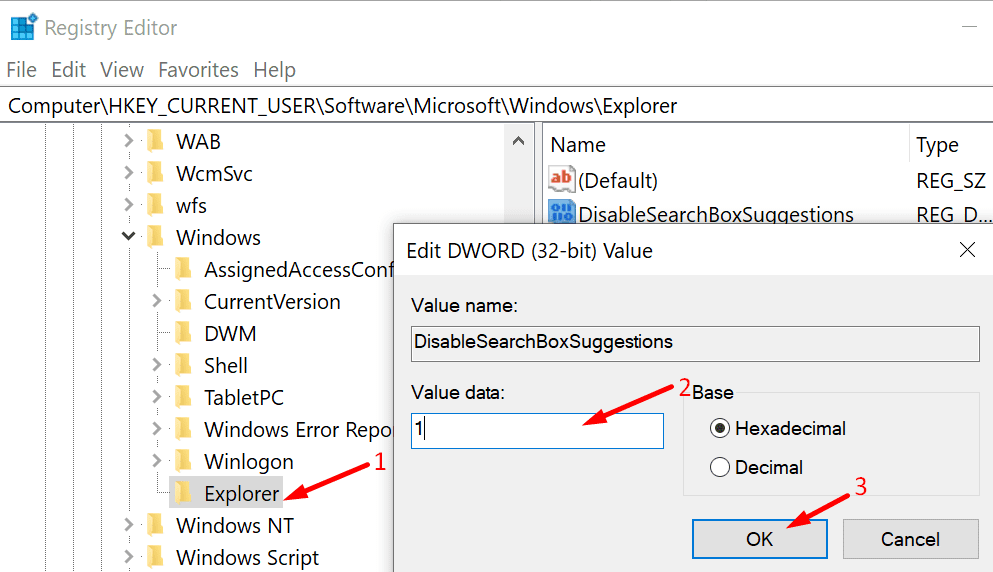
    • Explorerfile explorer windows 10 registry
  4. Right-click in the right pane and select New > DWORD (32-bit) Value.
  5. Name the new value DisableSearchBoxSuggestions.
  6. After you created it, double-click on it.
  7. Edit its value data from zero to 1.disable search box suggestions windows 10
  8. Then restart your computer to apply the changes.

If you can’t find that path on your computer, this indicates you’re running an older Windows  version.

Here are the steps to follow for Windows 11:

  1. Go to the Windows search bar and type regedit.
  2. Double-click on the Registry Editor.
  3. Now, go to the following path:
    • Computer
    • HKEY_CURRENT_USER
    • Software
    • Microsoft
    • Windows
    • CurrentVersion
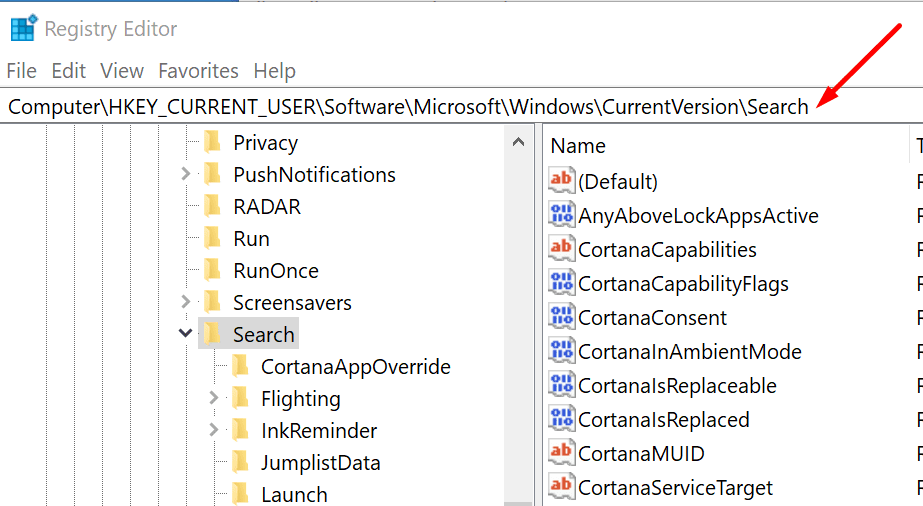
    • Searchturn off quick searches windows 10 registry editor
  4. Right-click on the Search key.
  5. Select New > DWORD (32-bit) Value.
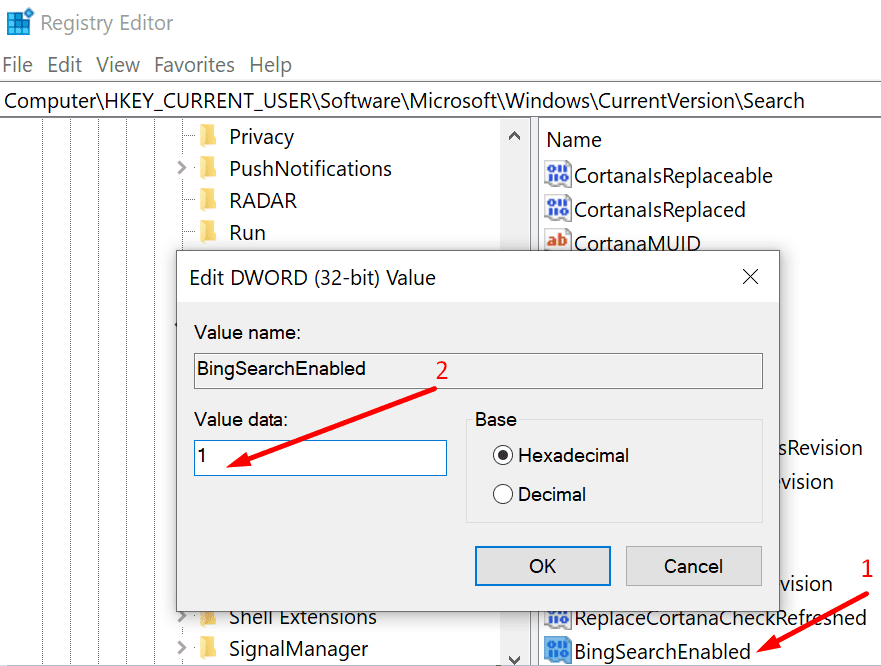
  6. Next, create a new value and name it BingSearchEnabled.
  7. Double-click on BingSearchEnabled and edit its value from zero to 1.bingsearchenabled registry editor
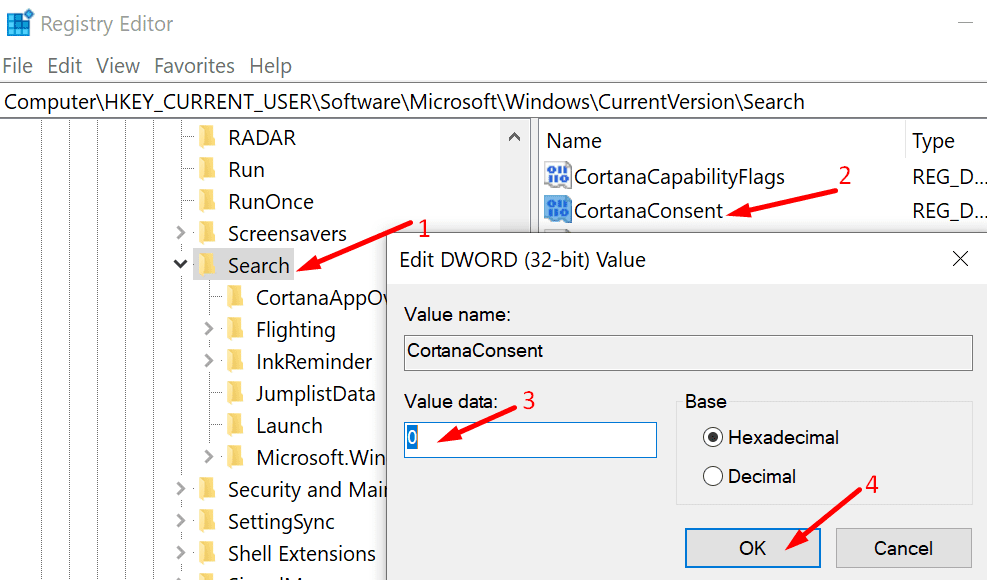
  8. Locate the CortanaConsent key. It should be visible under BingSearchEnabled.
  9. Double-click on CortanaConsent and edit the value data from 1 to 0 (zero).disable cortana consent windows 10
    • Note: If the CortanaConsent key is not visible, create it yourself. Right-click on Search and select New > DWORD (32-bit) Value. Then name the new key CortanaConsent and set its value to 0.

Conclusion

Disabling Bing Search should be enough to get rid of Quick Searches. In other words, Windows 10 will no longer annoy you with web results you’re not really interested in.

Let us know if you managed to disable Quick Searches using the method described above. Hit the comments below.

Categories: WindowsTagged Updated0723

Author Madalina Dinita

Madalina has been a Windows fan ever since she got her hands on her first Windows XP computer. She is interested in all things technology, especially emerging technologies -- AI and DNA computing in particular.

You Might Also Like

  • Gear Icon Header

    Enable/Disable Numlock at Windows Startup

    Mitch BartlettWindows
  • Windows 11: Access Denied When Modifying HOSTS or LMHOSTS file

    Mitch BartlettWindows
  • Windows Settings Header

    Windows 11: Fix “This publisher has been blocked from running software…”

    Mitch BartlettWindows
  • Win11 Send to Email Header

    Windows 11: “Mail recipient” Missing from “Send to” Menu

    Mitch BartlettWindows

Leave a Reply

Your email address will not be published. Required fields are marked *

how to allocate more memory to a program

How to Allocate More Memory to a Program in Windows

marvel rivals memory leak fix

Marvel Rivals Using Too Much Memory – How to Fix

how to create a macro in word

How to Create a Macro in Word

how to set video as screen saver

How to Set a Video as Your Screen Saver on Windows 11

how to fix 0xc000007b Error

Error 0xc000007b – What Is It and How to Fix It

profile pic

The Experts Behind Technipages

My name is Mitch Bartlett. I've been working in technology for over 20 years in a wide range of tech jobs from Tech Support to Software Testing. I started this site as a technical guide for myself and it has grown into what I hope is a useful reference for all.

Learn More

technipages logo white
linkedin icon

Technipages is part of Guiding Tech Media, a leading digital media publisher focused on helping people figure out technology. Learn more about our mission and team here.

© 2025 Guiding Tech Media All Rights Reserved

  • About Us
  • Contact
  • Legal & Privacy

© 2025 Guiding Tech Media All Rights Reserved

Information from your device can be used to personalize your ad experience.
Do not sell my personal information.

Last Updated on July 26, 2023 by Mitch Bartlett