

The autofill feature on any browser is meant to help you fill out forms faster. You only have to enter the information once, and the next time you find yourself before a form to fill out, the browser takes care of the rest. But, even though it’s convenient, you can’t shake off feeling uncomfortable about having your personal information on the browser. Keep reading to see how to remove saved information from Firefox autofill and not worry about your info anymore, whether you’re using Firefox on your computer or your Android device.
Contents
How to Remove Saved Information From Firefox Autofill
Once you open Firefox, click on the three-lined menu at the top right and click on Settings. Once you’re in, click Privacy and Security and scroll down to Logins and Passwords. In that section, click on Saved Logins, and if you have a master password enabled, you’ll need to enter that. You’ll see the usernames and passwords.
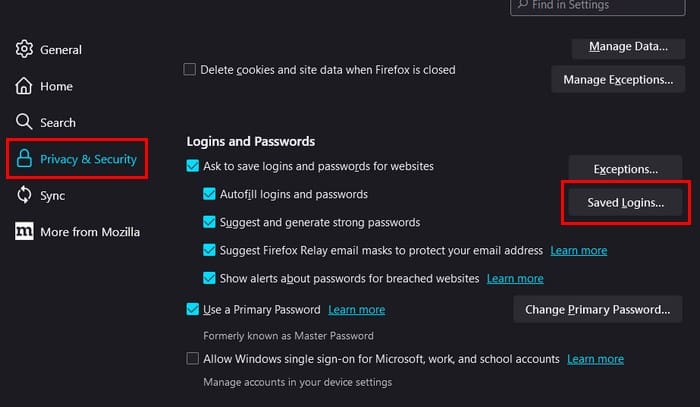
To remove the information, click the Remove option at the top right. But if you want to edit, you can also do that. This is great when you need to remember a saved password since you can click on the eye icon to view them. But if you want to leave no stone unturned when erasing your information, you can erase Autofill Entry History in Firefox.
You can do this by clicking on the three-lined menu at the top right and clicking on the History options. Click on the Clear recent history option, and a window will appear with different options you’ll need to choose from.

When you first access the option, everything will be selected. But if there is something you don’t want to erase, uncheck the box for options such as:
- Browsing and download history
- Active logins
- Form and search history
- Cookies
- Cache
- Site settings
- Offline website data
Remember to choose the Everything option in the Time Range to Clear option. Once you’re done, click on the Clear Now button. But unless you turn off this feature, Firefox will keep remembering your information in the future. If you don’t want this to happen, turn it off by clicking on the three-lined menu and going to Settings > Privacy and Security. In the History section, click on the dropdown menu for Firefox will dropdown menu and choose never remember history to stop the collection on browsing, download, and search history. But you have options with the Use custom settings for history option. You can uncheck for everything you don’t want to browser to collect, such as:
- Always use private browsing mode
- Remember browsing and download history
- Remember search and form history
- Clear history when Firefox closes
By unchecking these options, you never have to worry about Firefox saving any information you type on any site.
How to Remove Saved Information From Firefox Autofill on Android
Do you also have some saved information on your Android device? If so, you can erase it by opening the app and tapping the three dots at the bottom right. Go to Settings and tap on Autofill. Toggle off Save and autofill addresses so it doesn’t continue to save your information. Tap on Manage Addresses and choose the address you want to remove. Tap on the trash icon at the top to erase it. Repeat the process for other addresses.
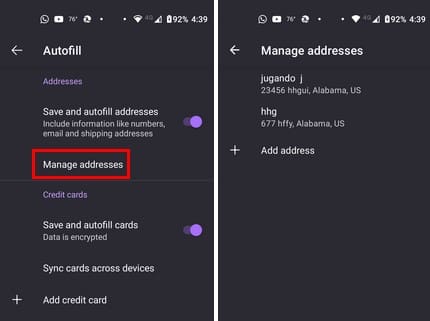
In the Autofil section, you’ll also see the Credit Cards section. To stop Firefox from saving that info in the future, toggle off the option. Select the card you want to remove and choose the trash icon to erase.
In Settings, you’ll see an option to erase any logins and passwords and stop Firefox from saving them in the future. Tap on Logins and Passwords and tap on Save logins and passwords. Choose the Never Save option, and you’re done.

Go back to Logins and passwords and toggle off Autofill in Firefox and Autofill in other apps. At the bottom, you’ll also see the Saved logins option, where you can access them and choose the ones you want to erase by tapping the trash icon when opening them.
Further Reading
Speaking of erasing personal data, if you need to wipe sensitive data from your Android 11 device, here are the steps to follow. You could send more information than you’d like when you send files, so here’s how to view and delete your file’s metadata. Also, if you don’t like the idea of Google knowing where you are, here is how to access and erase your Google Maps history. As for those times when you want to wipe everything clean, here is how to wipe your Mac Hard Drive.
Conclusion
Saving information on Firefox may have seemed like a good idea at first, but erasing it is quick and easy if you regret doing it. You can erase your info whether you’re using your computer or your Android device. The changes can be changed again at any time, and you can also prevent Firefox from saving any info by toggling off a few options here and there. For how long did you keep personal data on Firefox? Let me know in the comments below, and don’t forget to share the article with others on social media.


Yes! This helped very much. Thanks for the instruction and keeping it simple.