Skip to content
LogoTechnipages
LogoTechnipages
  • Topics
        • Android
        • Browsers
        • Gaming
        • Hardware
        • Internet
        • iPhone
        • Linux
        • macOS
        • Office
        • Reviews
        • Software
        • Windows
        • Definitions
        • All Recent Posts
  • Product Reviews
  • About

Facebook: How to Delete Posts in Bulk

Judy SanhzDecember 28, 2020 Comments (2)
permanently delete facebook messages both sides

Maybe that virus joke you posted on Facebook a year doesn’t seem so funny now, and you want to erase it. No one’s perfect, so there’s come a time when you might post something that’ll make you ask yourself,¨What in the works was I thinking?¨. The best way to remove those posts and save time is to remove them in bulk; let’s see how you can do that.

Contents

  • 1 How to Remove Facebook Posts in Bulk
  • 2 How to Bulk Erase Facebook Posts on Mobile App
    • 2.1 Final Thoughts

How to Remove Facebook Posts in Bulk

You have better things to do than spend who knows how much time erasing posts you wish you never posted. The fastest way to erase Facebook posts is to do it in bulk. But, keep in mind that Facebook is only going to allow you to erase as many as 50 at a time.

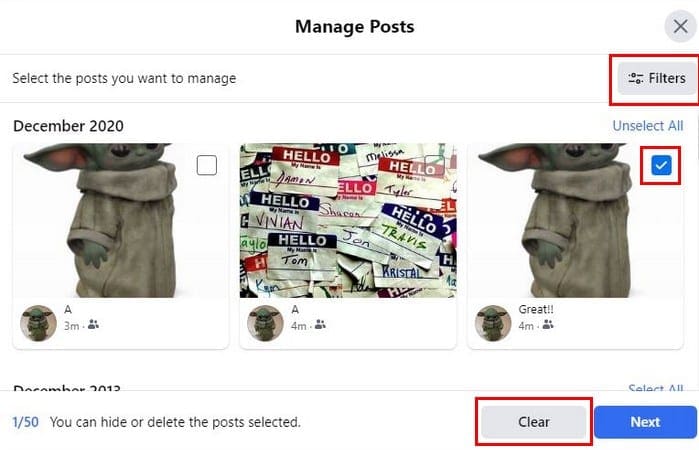
To start erasing, go to the Facebook account that has the posts you want to erase. Click on your profile picture and go to Manage Posts.

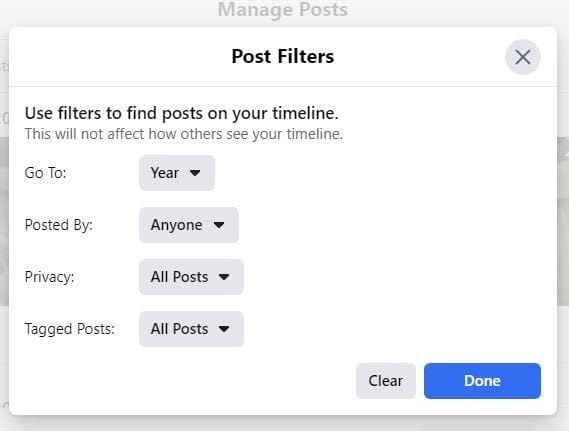
Once you see your posts, you can click on the Choose All option and start erasing in bulk. There’s also a Filters option.

You can filter your posts by:

  • Year
  • Posted By
  • Privacy
  • Tagged Posts

If you need to take a closer look at a post before erasing it try choosing the thumbnail since it’ll show you the complete post. By taking a look at the post before erasing it, you avoid losing the posts you want to keep.

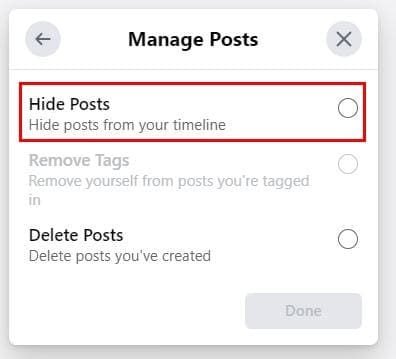
When you’re sure of the posts you want to erase, and they’re all selected, click on the Next button. Now, you only have to choose Delete Posts, followed by done, and you’re good to go. If you’re unsure if you want to erase a post, you can always choose to hide it instead. After choosing the posts, you want to erase and click on next and choose the Hide Posts option. It’s going to be the first one on the list.

How to Bulk Erase Facebook Posts on Mobile App

It would help if you bulked erase posts for those times, but you’re not on your computer; here how you can erase posts on Facebook using the app. Tap on your profile icon, followed by the dots to the right of the Add to store option. Tap on the Activity Log option and the non the Manage Activity option at the top.

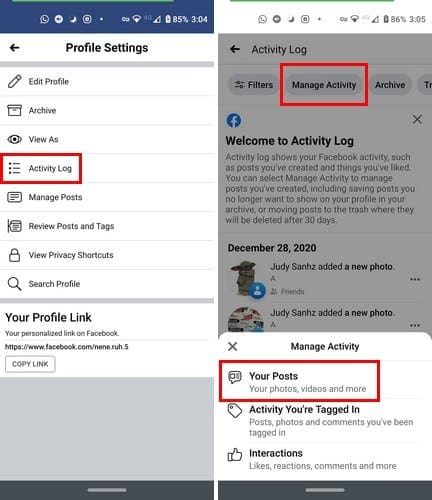
When a small window pops up from below, choose Your Posts.  To only choose a few posts, tap on the empty box to the side of the post. To mass delete, choose the all option. Just like in the desktop version, you’ll see the Filters option. You can choose from filters such as:

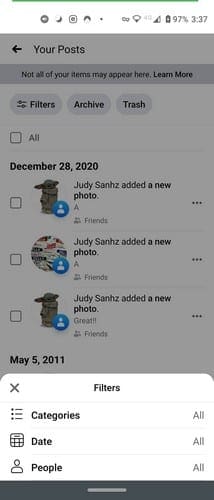
  • Categories – You can choose from All, Text Updates, Check-ins, Notes, and More. Photos and Videos, Posts from Other Apps.
  • Filter by date – Set the Start and End date.
  • Filter by person – Use the search tool to find the person.

Final Thoughts

Thanks to the filter options, deleting the posts you want is a lot easier. Regardless if you’re using Facebook on your computer or your device, the steps are rather similar. Did you have to erase a lot of posts? Share your thoughts in the comments below.

Categories: Android | Internet

Author Judy Sanhz

I am a tech geek who loves technology. I have been writing about tech for over a decade, covering various devices and programs. I write about Android, Apple, and Windows devices and programs. I stay updated on the latest gadgets, upgrades, features, and news. I aim to make complicated tech information easy for everyone to read. I've been with TechniPages from the beginning to help others fix their tech issues with the easy-to-follow guides.

You Might Also Like

  • Samsung Android Browser: Enable the QR Code Scanner

    Mel HawthorneAndroid
  • Google Duo on Android: How To Add Automatic Captions To Video and Audio Messages

    Mel HawthorneAndroid
  • Mastodon Social

    Mastodon: How to Enable or Disable Dark Mode

    Judy SanhzAndroid
  • How to Set up and Use a Passkey for Your Google Account

    Andrew MyrickAndroid

Comments

  1. Carolina Felix says:
    April 22, 2023 at 1:15 am

    I don’t want so many posts of my friends and posts of some ads

  2. Amy says:
    June 23, 2022 at 5:18 pm

    Let me to on Facebook

Leave a Reply

Your email address will not be published. Required fields are marked *

marvel rivals memory leak fix

Marvel Rivals Using Too Much Memory – How to Fix

how to create a macro in word

How to Create a Macro in Word

how to set video as screen saver

How to Set a Video as Your Screen Saver on Windows 11

how to fix 0xc000007b Error

Error 0xc000007b – What Is It and How to Fix It

0x80070024 media is write protected

What to Do When You See the 0x80070024 Media Is Write Protected

profile pic

The Experts Behind Technipages

My name is Mitch Bartlett. I've been working in technology for over 20 years in a wide range of tech jobs from Tech Support to Software Testing. I started this site as a technical guide for myself and it has grown into what I hope is a useful reference for all.

Learn More

technipages logo white
linkedin icon

Technipages is part of Guiding Tech Media, a leading digital media publisher focused on helping people figure out technology. Learn more about our mission and team here.

© 2025 Guiding Tech Media All Rights Reserved

  • About Us
  • Contact
  • Legal & Privacy

© 2025 Guiding Tech Media All Rights Reserved

Information from your device can be used to personalize your ad experience.
Do not sell my personal information.

Last Updated on December 28, 2020 by Judy Sanhz